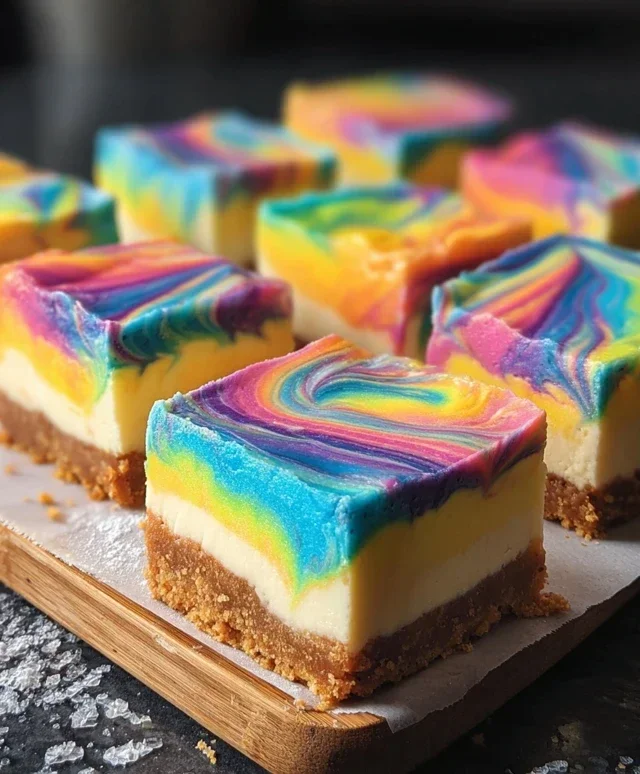
Rainbow Cheesecake Swirl Bars- Easy Dessert
Rainbow Cheesecake Swirl Bars are more than just a dessert; they’re a vibrant celebration on a plate! Have you ever craved a treat that’s as visually stunning as it is utterly delicious? That’s exactly what these bars deliver. People absolutely adore cheesecake for its creamy, dreamy texture and rich flavor, and when you swirl in the magic of a rainbow, it elevates the experience to a whole new level. What truly makes these Rainbow Cheesecake Swirl Bars so special is the delightful surprise in every bite. The classic tang of cream cheese is perfectly balanced by the sweet burst of colorful fruit flavors, creating a symphony of tastes and a feast for the eyes. Whether you’re looking to brighten up a party or simply indulge in a moment of pure joy, these bars are guaranteed to impress.
Why You’ll Love These Rainbow Cheesecake Swirl Bars:
Unforgettable Flavor: Creamy cheesecake meets vibrant fruit.
Stunning Presentation: A dazzling rainbow swirl that wows.
Perfect for Sharing: A crowd-pleasing dessert for any occasion.
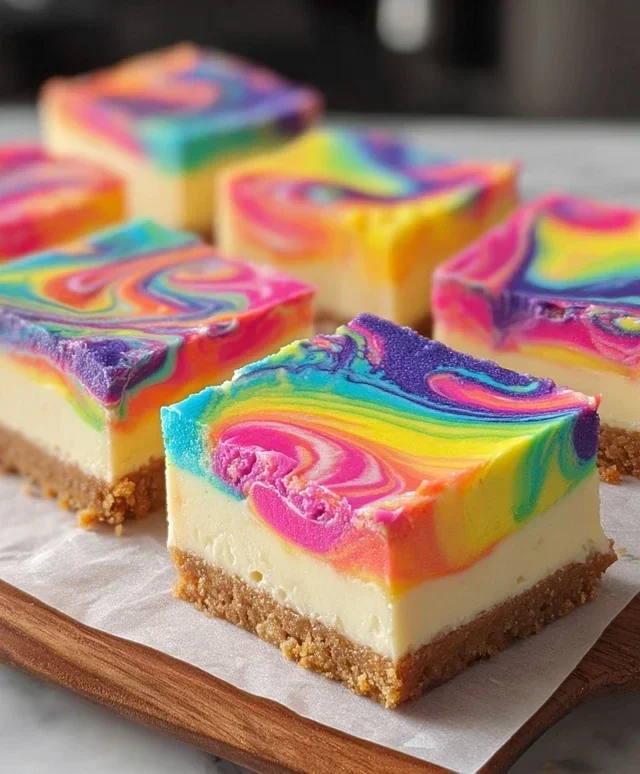
Rainbow Cheesecake Swirl Bars
Get ready to bake up a dessert that’s as vibrant and fun as a summer day! These Rainbow Cheesecake Swirl Bars are a showstopper, combining a buttery cake base with swirls of creamy, colorful cheesecake. They’re surprisingly easy to make and are guaranteed to bring a smile to anyone’s face. The beauty of these bars lies in their visual appeal, but don’t underestimate the deliciousness! The slightly sweet, tender cake pairs perfectly with the rich, tangy cheesecake. Let’s dive into creating these edible works of art!
Ingredients:
Making the Cake Base
First things first, we need to prepare the foundation for our rainbow creation. This is a simple cake mix recipe that provides a wonderful chewy and buttery base.
1. Preheat your oven to 350 degrees Fahrenheit (175 degrees Celsius). Grease and flour a 9×13 inch baking pan. This step is crucial to ensure your bars don’t stick and come out cleanly. You can also line the pan with parchment paper, leaving an overhang on the sides, which makes lifting the bars out much easier.
2. In a large bowl, combine the contents of the white cake mix box, the 1/2 cup of melted butter, 1 egg, and 2/3 cup of milk.
3. Mix these ingredients together until just combined. Be careful not to overmix; this can lead to a tough cake. A few streaks of flour are perfectly fine. The batter will be quite thick, which is exactly what we want for a sturdy base.
4. Press about two-thirds of this cake batter evenly into the bottom of your prepared baking pan. Use your fingers or the back of a spoon to spread it out. This will form the bottom layer of your bars.
Crafting the Cheesecake Swirls
Now for the star of the show – the colorful cheesecake! This part is where the magic happens and the rainbow truly comes to life.
1. In a separate medium bowl, beat together the 12 ounces of softened cream cheese, 1/3 cup of sugar, and 1 egg. Make sure your cream cheese is truly softened; this will prevent lumps and ensure a smooth, creamy texture. You can do this with an electric mixer on medium speed or with a sturdy whisk, just ensure you get it nice and smooth.
2. Stir in the 1 teaspoon of vanilla extract. This adds that classic cheesecake flavor that we all love. Mix until just incorporated.
3. Now it’s time to divide the cream cheese mixture. You’ll want to divide it into six small bowls. Take a small spoon and try to get roughly equal portions into each bowl. This ensures you have enough of each color.
4. Add a different gel food color to each of the six bowls: pink, orange, yellow, green, blue, and purple. Gel food colors are fantastic because they are highly concentrated, meaning you only need a tiny amount to achieve vibrant colors without watering down your cheesecake mixture. Start with a small drop and add more until you reach your desired shade. Stir each color in thoroughly.
5. Now, grab the remaining one-third of your cake batter. In a small bowl, add the 9 extra teaspoons of milk, a teaspoon at a time, to this remaining batter. You want to thin this portion of the batter down just enough so that it can be drizzled. It should be pourable but not watery. Mix gently until smooth.
Assembling and Baking Your Rainbow Bars
This is where we bring everything together to create those beautiful swirls. Patience and a gentle hand will be rewarded!
1. Dollop spoonfuls of each colored cheesecake mixture randomly over the cake base in the pan. Don’t worry about perfection here; a haphazard distribution will create more interesting swirls.
2. Next, drizzle the thinned cake batter randomly over the dollops of cheesecake. Again, think random zigzags and swirls.
3. Now, for the swirling! Take a butter knife or a skewer and gently swirl the batters together. Make figure-eight motions and gentle zigzags through both the cheesecake and the thinned cake batter. Be careful not to over-swirl, as this can muddy the colors and make them less distinct. The goal is to create beautiful, marbled patterns.
4. Bake in the preheated oven for 30-35 minutes, or until the edges are set and a toothpick inserted into the center comes out mostly clean. The center might still have a slight jiggle, which is normal for cheesecake. Overbaking can make the cheesecake tough.
5. Let the bars cool completely in the pan on a wire rack. This is a very important step for the cheesecake to set properly. Once cooled, refrigerate them for at least 2 hours, or preferably overnight. Chilling is essential for clean cuts and to allow the flavors to meld.
6. Once thoroughly chilled, lift the bars out of the pan using the parchment paper overhang (if you used it) or carefully cut them directly in the pan. Slice into bars and enjoy your stunning, homemade Rainbow Cheesecake Swirl Bars! They are best served cold and are a guaranteed crowd-pleaser.
Conclusion:
I hope you’ve enjoyed learning how to create these absolutely delightful Rainbow Cheesecake Swirl Bars! They are truly a showstopper, offering a vibrant visual appeal that’s matched only by their incredible taste and creamy texture. The magic truly lies in the swirl, transforming a classic cheesecake into something whimsical and fun. These bars are perfect for parties, potlucks, or simply as a cheerful treat to brighten your day. I love serving them chilled, perhaps with a dollop of whipped cream or a scattering of fresh berries to complement the sweetness.
Don’t be afraid to get creative with your own variations! Consider adding a touch of citrus zest to the cream cheese mixture for a brighter flavor, or maybe some mini chocolate chips for an extra textural element. For an adult twist, a splash of liqueur extract could be a decadent addition. I truly encourage you to give these Rainbow Cheesecake Swirl Bars a try; they are surprisingly easy to make and the results are incredibly rewarding. You’ll be amazed at how quickly they disappear!
Frequently Asked Questions:
Can I make these bars ahead of time?
Absolutely! These bars are perfect for making ahead. In fact, I find they taste even better after chilling for at least 4-6 hours or even overnight, allowing the flavors to meld beautifully. Store them covered in the refrigerator.
How do I get the swirls to look so defined?
The key to defined swirls is to add the colored cream cheese mixtures and then gently swirl them with a toothpick or skewer. Don’t over-swirl, as this will blend the colors too much. A few gentle passes are all you need!
What other colors can I use for the swirls?
The rainbow is your oyster! Feel free to use any food coloring gel colors you have on hand. Pastels, jewel tones, or even just two contrasting colors can create stunning effects. Experiment and have fun with it!
Rainbow Cheesecake Swirl Bars
Vibrant and delicious bars featuring a cake crust swirled with colorful cream cheese layers.
Ingredients
-
1 box white cake mix
-
1/2 cup melted butter
-
1 egg
-
2/3 cup milk, plus 9 extra teaspoons
-
Gel food colors: pink, orange, yellow, green, blue, and purple
-
12 oz cream cheese, softened
-
1/3 cup sugar
-
1 egg
-
1 teaspoon vanilla extract
Instructions
-
Step 1
Preheat oven to 350°F (175°C). Grease and flour a 9×13 inch baking pan. -
Step 2
In a bowl, combine white cake mix, melted butter, 1 egg, and 2/3 cup milk. Mix until just combined, then stir in 3 extra teaspoons of milk if needed to form a thick batter. -
Step 3
Press half of the cake batter evenly into the prepared baking pan to form the crust. Bake for 10-12 minutes until lightly golden. -
Step 4
While the crust bakes, beat softened cream cheese, 1/3 cup sugar, the remaining egg, and vanilla extract until smooth. Divide the cream cheese mixture into six small bowls. Add a drop of each gel food color to separate bowls and stir until evenly colored. -
Step 5
Remove the crust from the oven. Dollop spoonfuls of each colored cream cheese mixture over the warm crust. Drizzle the remaining cake batter over the cream cheese. Using a knife or skewer, gently swirl the cake batter and cream cheese together to create a marbled effect. -
Step 6
Bake for 20-25 minutes, or until the edges are set and lightly golden. Let cool completely on a wire rack before cutting into bars.
Important Information
Nutrition Facts (Per Serving)
It is important to consider this information as approximate and not to use it as definitive health advice.
Allergy Information
Please check ingredients for potential allergens and consult a health professional if in doubt.