Sticky Coconut Cake Recipe-Irresistible Sweetness
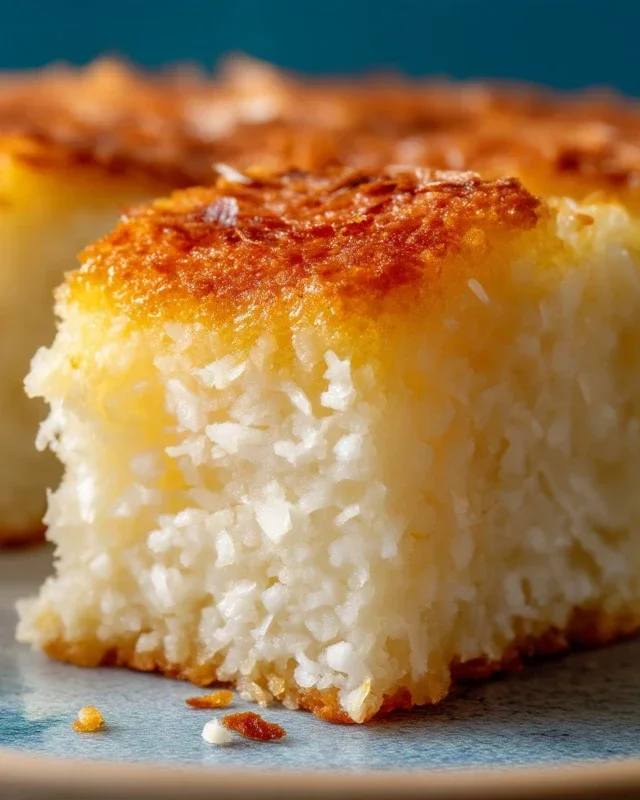
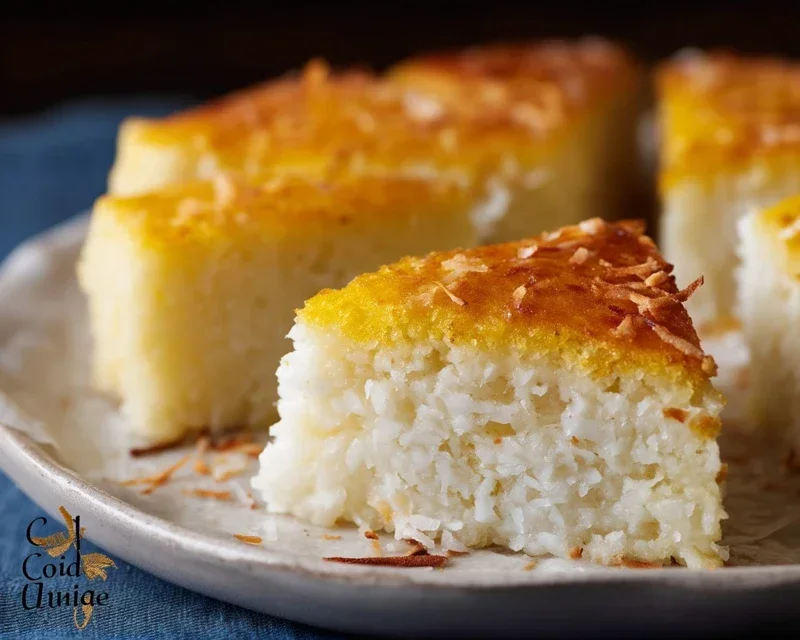
Sticky Coconut Cake is a dessert that truly lives up to its name, offering a delightful dance of textures and tropical flavors that will transport your taste buds straight to paradise. There’s a reason why this particular confection holds a special place in so many hearts – it’s incredibly comforting, wonderfully moist, and that irresistible caramel-like topping just begs for another slice. What makes our Sticky Coconut Cake so special? It’s the perfect balance of sweet, slightly toasted coconut, infused into a tender crum extractb, all crowned with a luscious, golden glaze that hardens just so. It’s the kind of cake that feels both decadent and familiar, perfect for cozy afternoons, celebratory gatherings, or simply when you need a little bit of sunshine in your day. Get ready to fall in love with this amazing Sticky Coconut Cake!
Sticky Coconut Cake
This Sticky Coconut Cake is an absolute delight, a tender, moist, and wonderfully aromatic dessert that’s surprisingly simple to make. It’s the perfect treat for afternoon tea, a special occasion, or simply when you’re craving something sweet and comforting. The beautiful golden hue and the irresistibly chewy texture come from a generous amount of shredded coconut and the richness of coconut milk. The subtle sweetness is perfectly balanced, making each bite a pure pleasure. I love how this cake almost feels like a cross between a traditional cake and a delicious mochi-like confection – it’s truly unique!
Ingredients:
Cooking Instructions
Creating this Sticky Coconut Cake is a multi-step process, but each step is straightforward and contributes to the incredible final result. I find it’s best to have all my ingredients measured and ready before I begin extract, as some steps move along quite quickly.
Step 1: Preparing the Coconut Mixture
Our journey begin extracts by infusing the shredded coconut with the creamy goodness of coconut milk. In a medium saucepan, combine the 2¼ cups of full fat canned coconut milk with the 3 cups of shredded sweetened coconut. Add the 1 teaspoon of vanilla extract to this mixture as well. Stir everything together gently. Now, place this saucepan over medium-low heat. The goal here isn’t to boil it vigorously, but rather to gently heat the mixture, allowing the coconut to absorb some of the liquid and for the flavors to meld beautifully. Stir occasionally for about 5 to 7 minutes. You’ll notice the shredded coconut will soften slightly and become more plump. This gentle warming helps to distribute the vanilla aroma throughout the coconut. Once it’s heated through and fragrant, remove the saucepan from the heat and let it sit for about 10 minutes. This resting period allows the coconut to fully hydrate and the flavors to deepen, setting the stage for the incredible texture and taste of our cake.
Step 2: Creating the Batter Base
Now, it’s time to build the base of our cake batter. In a large mixing bowl, take the 2 egg yolks and add the 1¼ cup of granulated sugar. Using a whisk or an electric mixer on medium speed, beat these together until the mixture becomes pnon-alcoholic ale yellow and forms ribbons when you lift the whisk. This process, known as ‘ribbon stage,’ is crucial for incorporating air and creating a lighter texture in the final cake. It might take a few minutes of beating, so be patient. Once you’ve achieved this light and fluffy consistency, it’s time to add the prepared coconut and coconut milk mixture from Step 1. Pour the entire contents of the saucepan into the bowl with the egg yolk and sugar mixture. Stir gently until everything is just combined. Don’t overmix at this stage; we want to incorporate the wet ingredients smoothly.
Step 3: Incorporating the Glutinous Rice Flour
Next, we introduce the ingredient that gives our Sticky Coconut Cake its signature chewy texture: glutinous rice flour. Gradually add the 1½ cup of glutinous rice flour to the wet ingredients in the large mixing bowl. It’s best to add it in two or three additions, stirring gently after each addition until it’s just incorporated. You can use a spatula or a wooden spoon for this. Glutinous rice flour can be a bit sticky, so avoid overmixing, which can lead to a tough cake. We’re looking for a thick, cohesive batter that has a beautiful, glossy sheen from the coconut milk. Ensure there are no dry pockets of flour remaining. The batter will be quite dense at this point, which is exactly what we want for that delightful chegrape juicess.
Step 4: Whipping the Egg Whites
This step is key to adding a little lightness and structure to our dense batter. In a separate, clean, and dry bowl, add the 2 egg whites. Make sure there is absolutely no trace of yolk in the egg whites, as even a tiny amount can prevent them from whipping properly. Using an electric mixer with clean beaters, start whipping the egg whites on medium speed. As they begin extract to get foamy, gradually increase the speed to high. Continue whipping until you achieve stiff peaks. This means that when you lift the beaters out of the egg whites, the peaks that form stand straight up and don’t curl over. This creates a meringue-like texture that we will gently fold into our batter.
Step 5: Folding and Baking
Now it’s time to bring everything together. Gently fold about a third of the whipped egg whites into the thick batter from Step 3. Use a spatula and a folding motion (cutting down through the middle, then scraping up the sides and over). This lightens the main batter. Once that’s incorporated, gently fold in the remaining whipped egg whites in two more additions, being careful not to deflate the airy egg whites too much. The goal is to maintain as much air as possible.
Preheat your oven to 350°F (175°C). Lightly grease and flour an 8×8 inch baking pan or a similar-sized round cake pan. Pour the batter evenly into the prepared pan. Smooth the top with your spatula. Bake for 30-40 minutes, or until a wooden skewer inserted into the center comes out clean and the top is golden brown. The cake should be firm to the touch.
Step 6: Cooling and Enjoying
Once baked, carefully remove the cake from the oven and let it cool in the pan on a wire rack for at least 15-20 minutes. This is important because the cake is quite delicate when hot and needs time to set. After the initial cooling period, you can carefully invert the cake onto the wire rack to cool completely. This Sticky Coconut Cake is best enjoyed at room temperature or slightly warm. You can serve it as is, or with a dusting of powdered sugar, or even a dollop of whipped cream. The texture is wonderfully chewy and moist, and the coconut flavor is simply divine. Enjoy every delicious bite!
Conclusion:
I truly hope you’ve enjoyed learning how to make this absolutely delightful Sticky Coconut Cake! It’s a recipe that’s truly special because of its wonderfully moist crum extractb, the subtle sweetness from the coconut, and that irresistible sticky glaze that just melts in your mouth. It’s surprisingly simple to whip up, making it perfect for a weekend treat or even a last-minute dessert when friends are coming over. I love serving this cake warm, perhaps with a dollop of whipped cream or a scoop of vanilla ice cream to complement the rich coconut flavor. For a different twist, consider adding a handful of toasted macadamia nuts for a lovely crunch, or a touch of lime zest to the batter for a bright, zesty note. Don’t be afraid to experiment and make it your own!
This Sticky Coconut Cake is a crowd-pleaser, and I can’t encourage you enough to give it a try. The aroma alone as it bakes is heavenly, and the taste is even better. Let me know how yours turns out!
Frequently Asked Questions:
Can I make this cake ahead of time?
Absolutely! This cake actually benefits from being made a day in advance. The flavors meld together beautifully, and the glaze becomes even more luscious. Just store it in an airtight container at room temperature. It should stay wonderfully moist for up to 3 days.
What kind of coconut should I use?
For the best flavor and texture, I recommend using unsweetened shredded coconut in the cake batter. For the topping, desiccated coconut works perfectly for that lovely toasted finish. Ensure it’s the unsweetened variety to control the overall sweetness of your Sticky Coconut Cake.
Is it possible to make this cake gluten-free?
While I haven’t tested it extensively, you could try substituting a good quality gluten-free all-purpose flour blend for the regular flour. You might need to adjust the liquid content slightly, so start with the same amount and see how the batter consistency is. Some people have had success with almond flour as well, which would also add a lovely nutty flavor.
Sticky Coconut Cake
A delightfully sweet and chewy cake made with coconut milk and glutinous rice flour, perfect for a tropical treat.
Ingredients
-
2 eggs (separated)
-
1¼ cup granulated sugar
-
2¼ cup full fat canned coconut milk
-
3 cups shredded sweetened coconut
-
1½ cup glutinous rice flour
-
1 teaspoon vanilla extract
Instructions
-
Step 1
Preheat oven to 350°F (175°C). Grease and flour a 9×13 inch baking pan. -
Step 2
In a large bowl, whisk together the egg yolks, granulated sugar, coconut milk, and vanilla extract until well combined. -
Step 3
Gradually add the glutinous rice flour to the wet ingredients, stirring until a smooth batter forms. Fold in 2 cups of the shredded coconut. -
Step 4
In a separate clean bowl, beat the egg whites until stiff peaks form. Gently fold the beaten egg whites into the batter. -
Step 5
Pour the batter into the prepared baking pan and sprinkle the remaining 1 cup of shredded coconut evenly over the top. -
Step 6
Bake for 40-50 minutes, or until a toothpick inserted into the center comes out clean and the top is golden brown. -
Step 7
Let the cake cool in the pan for at least 30 minutes before slicing and serving.
Important Information
Nutrition Facts (Per Serving)
It is important to consider this information as approximate and not to use it as definitive health advice.
Allergy Information
Please check ingredients for potential allergens and consult a health professional if in doubt.