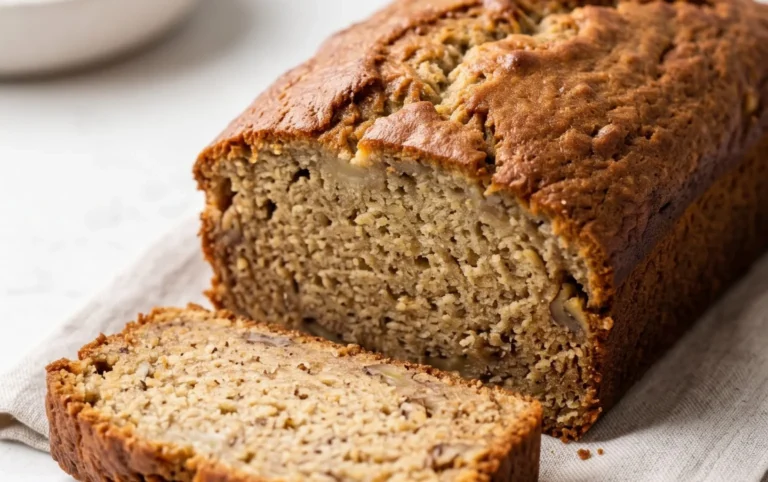
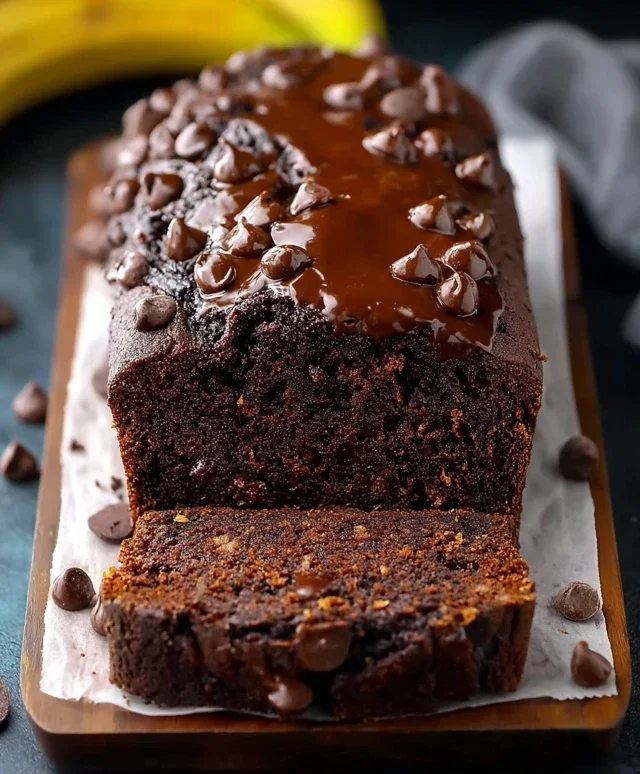
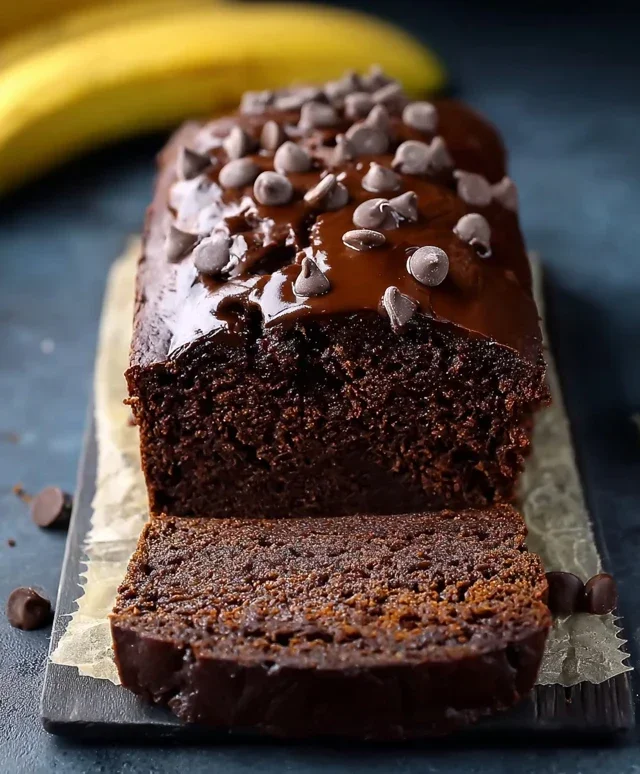
Healthy Chocolate Banana Bread Recipe – Easy Delicious
Healthy Chocolate Banana Bread is more than just a treat; it’s a hug in loaf form. We all have those cravings, right? That moment when only something warm, comforting, and decidedly chocolatey will do. But what if you could indulge that craving without the guilt? That’s where this incredible healthy chocolate banana bread recipe comes in. It’s the perfect marriage of sweet, ripe bananas and rich, dark chocolate, all baked into a moist, tender loaf that’s surprisingly good for you. Forget those heavy, overly sweet versions; our secret is a blend of wholesome ingredients that allow the natural sweetness of the bananas to shine, while the cocoa powder delivers that deep chocolatey goodness we adore. This isn’t just a dessert; it’s a guilt-free breakfast, a satisfying snack, or a delightful afternoon pick-me-up that will have you reaching for another slice, and another, without a second thought.
Why You’ll Love This Recipe
It’s a healthier twist on a classic.
Packed with flavor and naturally sweet.
Perfect for satisfying your chocolate cravings.
Healthy Chocolate Banana Bread
There’s something incredibly comforting about a warm slice of banana bread. But let’s be honest, traditional banana bread can often be a sugar and carb bomb disguised as a wholesome treat. That’s where this healthy chocolate banana bread comes in! We’ve swapped out refined flours and sugars for nutrient-dense alternatives, boosted the protein, and added the irresistible richness of chocolate. The result is a moist, flavorful, and guilt-free indulgence that you can enjoy for breakfast, a snack, or even a healthy dessert. This recipe is surprisingly simple to make and uses ingredients that are likely already in your pantry. Get ready to fall in love with a healthier version of a classic.
Ingredients:
Instructions:
Preparation is Key
The first step in creating this delicious loaf is to preheat your oven to 350°F (175°C). This ensures that your bread bakes evenly from the moment it enters the oven. Next, prepare your loaf pan. You can lightly grease and flour it, or for an even easier cleanup, line it with parchment paper. Leaving a little overhang on the sides of the parchment paper will make it simple to lift the baked bread out of the pan once it’s cooled. Now, let’s get to the stars of our show: the bananas. The riper, the better! Overripe bananas, with their speckled brown skins, are sweeter and mash more easily, contributing to a more moist and flavorful bread. If your bananas aren’t quite there yet, don’t worry, but the riper they are, the better the final outcome will be.
Mashing and Mixing the Wet Ingredients
In a large mixing bowl, mash your ripe bananas thoroughly. You can use a fork for this, aiming for a mostly smooth consistency with just a few small lumps remaining. These little banana bits will add texture to your bread. Once the bananas are mashed, add the two large eggs, the nut butter of your choice, and your granular sweetener. If you’re using monk fruit sweetener, you can typically use it in a 1:1 ratio with sugar, but always check the packagin extractg for specific conversion rates. If you prefer a more traditional flavor, brown sugar works wonderfully and adds a slight caramel note. Now, pour in the vanilla extract and the sea salt. The vanilla enhances the sweetness and flavor, while the sea salt balances out the sweetness and brings all the flavors together. Whisk these wet ingredients together vigorously until everything is well combined and the mixture is smooth and creamy. Ensure there are no streaks of egg or nut butter. This thorough mixing of the wet ingredients is crucial for a cohesive batter.
Combining the Dry Ingredients
In a separate medium-sized bowl, we’ll combine all our dry ingredients. This step is important for ensuring that the leavening agents and cocoa powder are evenly distributed throughout the batter, which will prevent dense pockets or an uneven rise. Measure out your oat flour. Oat flour is a fantastic choice as it’s packed with fiber and gives the bread a lovely, slightly dense yet tender texture. If you don’t have oat flour, you can use all-purpose flour, whole wheat flour, or a gluten-free blend. Next, add the cocoa powder. Use unsweetened cocoa powder for the best chocolate flavor. Sift it if you notice it’s clumpy, to ensure no dry pockets remain. Then, add the baking powder. Baking powder is our leavening agent, responsible for giving the bread its rise and airy texture. Finally, if you’re using it, add your protein powder. As noted, this ½ cup (50 g) of protein powder can replace ½ cup (50 g) of your flour. This is a great way to boost the protein content of your bread, making it more filling and satisfying. Whisk these dry ingredients together until they are completely uniform. You should see a homogenous mix of flour, cocoa, baking powder, and protein powder.
Bringin extractg it All Together and Baking
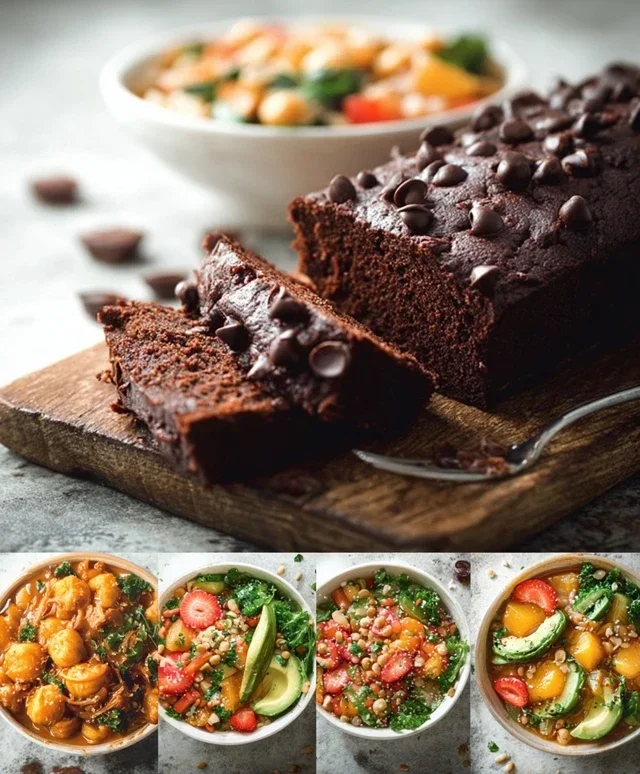
Now it’s time to combine the wet and dry ingredients. Gradually add the dry ingredients to the wet ingredients, mixing gently until just combined. It’s important not to overmix at this stage, as overmixing can develop the gluten too much (especially if you’re using wheat-based flour) and result in a tough bread. A few streaks of flour remaining are okay; they will incorporate as you fold in the chocolate chips. Gently fold in the ¼ cup of chocolate chips. These will melt slightly during baking, creating delightful pockets of gooey chocolate throughout your bread. If you want an extra chocolatey topping, sprinkle a few more chocolate chips on top of the batter before it goes into the oven. Pour the batter into your prepared loaf pan and spread it evenly. Place the loaf pan in the preheated oven and bake for 30-40 minutes. The baking time can vary depending on your oven, so start checking around the 30-minute mark. The bread is done when a toothpick inserted into the center comes out clean, or with just a few moist crum extractbs attached (not wet batter).
Cooling and Enjoying
Once your healthy chocolate banana bread is baked to perfection, remove it from the oven. Let it cool in the loaf pan for about 10-15 minutes. This allows the bread to set up properly and makes it easier to remove from the pan without it falling apart. After the initial cooling period, carefully lift the bread out of the pan using the parchment paper overhang, or invert it onto a wire rack to cool completely. Resist the urge to slice into it immediately while it’s still hot, as this can lead to a gummy texture. Letting it cool completely ensures the best texture and flavor. Once cooled, slice and enjoy! This bread is delicious on its own, or you can serve it with a smear of nut butter, a dollop of Greek yogurt, or a drizzle of honey. Store any leftover bread in an airtight container at room temperature for up to 3 days, or in the refrigerator for up to a week. You can also freeze slices for longer storage; simply wrap them tightly in plastic wrap and then place them in a freezer-safe bag.
Conclusion:
And there you have it – a truly delicious and incredibly satisfying Healthy Chocolate Banana Bread recipe! This isn’t just any banana bread; it’s a guilt-free indulgence that perfectly balances moist, tender crum extractb with rich chocolatey goodness. Packed with wholesome ingredients, it’s a fantastic way to enjoy a treat that also nourishes your body. Whether you’re looking for a healthier breakfast option, a satisfying snack, or a delightful dessert, this recipe truly delivers. The natural sweetness from ripe bananas, combined with the subtle bitterness of cocoa, creates a flavor profile that’s both comforting and complex. I encourage you to give this recipe a try; I’m confident you’ll find it to be a new staple in your baking repertoire. Enjoy it warm with a dollop of Greek yogurt, or toasted with a smear of almond butter for an extra protein boost. Don’t hesitate to experiment with additions like chopped walnuts or a sprinkle of cinnamon for your own unique twist!
Frequently Asked Questions:
Can I make this banana bread vegan?
Absolutely! To make this Healthy Chocolate Banana Bread vegan, simply substitute the eggs with a flax egg (1 tablespoon ground flaxseed mixed with 3 tablespoons water, let sit for 5 minutes) or a commercial egg replacer. Ensure your chocolate chips are also dairy-free.
What kind of chocolate chips are best?
For the healthiest option, I recommend using dark chocolate chips with a high cocoa content (70% or higher). This will provide a richer chocolate flavor and less added sugar. If you prefer a sweeter bread, milk chocolate chips will also work, but will increase the sugar content.
How long does this banana bread last?
Stored in an airtight container at room temperature, this banana bread will stay fresh for 2-3 days. For longer storage, you can refrigerate it for up to a week or freeze slices for several months. Simply thaw at room temperature or gently reheat in a toaster oven or microwave.
Healthy Chocolate Banana Bread
A moist and delicious chocolate banana bread, made healthier with wholesome ingredients and a touch of sweetness.
Ingredients
-
3 medium ripe bananas (about 12 oz/360 g in total)
-
2 large eggs
-
1/4 cup (60 g) almond butter
-
1/3 cup (70 g) monk fruit sweetener
-
1 tsp vanilla extract
-
1/6 tsp sea salt
-
1 cup (100 g) oat flour
-
1/2 cup (50 g) cocoa powder
-
2 tsp baking powder
-
1/4 cup (40 g) chocolate chips, plus extra for topping (optional)
-
1/2 cup (50 g) protein powder
Instructions
-
Step 1
Preheat oven to 350°F (175°C) and grease or line a loaf pan. -
Step 2
In a large bowl, mash the ripe bananas thoroughly. -
Step 3
Stir in the eggs, nut butter, sweetener, and vanilla extract until well combined. -
Step 4
In a separate bowl, whisk together the oat flour, cocoa powder, baking powder, sea salt, and protein powder. -
Step 5
Gradually add the dry ingredients to the wet ingredients, mixing until just combined. Fold in the chocolate chips. -
Step 6
Pour the batter into the prepared loaf pan and top with extra chocolate chips, if desired. -
Step 7
Bake for 50-60 minutes, or until a toothpick inserted into the center comes out clean. -
Step 8
Let cool in the pan for 10-15 minutes before transferring to a wire rack to cool completely.
Important Information
Nutrition Facts (Per Serving)
It is important to consider this information as approximate and not to use it as definitive health advice.
Allergy Information
Please check ingredients for potential allergens and consult a health professional if in doubt.