Easy Scones Recipe – Delicious Homemade Treat
Scones Recipe: Your gateway to buttery bliss awaits! There’s something undeniably comforting about a perfectly baked scone, isn’t there? Whether you’re envisioning a crisp, golden exterior giving way to a tender, crum extractbly interior, or picturing it spread with clotted cream and jam, the humble scone holds a special place in our hearts (and stomachs!). People adore this classic treat for its delightful simplicity and incredible versatility. It’s the perfect companion to a morning cup of tea, an elegant addition to afternoon tea, or even a satisfying standalone snack. What truly makes a scone special is the balance: that delicate crum extractb, the subtle sweetness, and the satisfying richness that comes from good quality butter. This scone recipe aims to capture that magic, promising you a batch of delightful, homemade scones that are sure to become a cherished staple.

Perfectly Fluffy Scones: A Simple Recipe for Delightful Treats
There’s something undeniably comforting about a warm, freshly baked scone. Whether you’re enjoying one with your morning coffee, as an afternoon tea treat, or even as a simple dessert, a perfectly made scone is a small piece of heaven. Forget those dry, crum extractbly disappointments you might have encountered; this recipe is designed to deliver light, fluffy, and incredibly tender scones every single time. It’s surprisingly simple, making it a fantastic option for bakers of all levels. Let’s dive into what you’ll need and how to create these delightful morsels.
Ingredients:
The Art of Scone Making: Step-by-Step Guide
Creating these scones is a straightforward process that relies on a few key techniques to ensure a light and tender crum extractb. The most important element is to keep your ingredients cold, especially the butter and cream. This helps to create those delightful flaky layers we’re aiming for.
1. Prepare Your Dry Ingredients and Cut in the Butter
Start by preheating your oven to 400°F (200°C). Line a baking sheet with parchment paper. In a large bowl, whisk together the all-purpose flour, granulated sugar, baking powder, and salt. Ensure these dry ingredients are thoroughly combined. Next, add the chilled, cubed unsalted butter to the flour mixture. Using a pastry blender, your fingertips, or a food processor on a pulse setting, cut the butter into the dry ingredients until the mixture resembles coarse crum extractbs with some pea-sized pieces of butter remaining. These small pockets of butter are crucial for creating steam during baking, which leads to a tender, flaky texture. Don’t overwork the mixture; you want to see those distinct butter pieces.
2. Combine Wet Ingredients and Form the Dough
In a separate small bowl, whisk together the ½ cup plus 1 tablespoon of chilled heavy cream and the lightly beaten large egg. Make a well in the center of your dry ingredient mixture and pour in the wet ingredients. Gently stir with a fork or spatula until the dough just begin extracts to come together. Be careful not to overmix. Overmixing develops the gluten in the flour too much, resulting in tough scones. It’s perfectly fine if there are still a few dry spots; they will incorporate as you handle the dough.
3. Incorporate Your Chosen Mix-ins
Now comes the fun part – adding your desired mix-ins! If you’re using fresh berries, gently fold them in. For ingredients like chocolate chips or dried fruit, they can be mixed in a bit more vigorously. Again, the key is to mix only until the additions are evenly distributed throughout the dough. Overworking at this stage will also lead to tough scones.
4. Shape and Cut the Scones
Turn the dough out onto a lightly floured surface. Gently pat the dough into a round disc, about ¾ to 1 inch thick. Do not knead the dough; just pat it together. Once you have your disc, you can cut it into wedges. You can also use a biscuit cutter to create individual rounds. If using a cutter, press straight down without twisting, as twisting can seal the edges and prevent them from rising evenly. If you cut wedges, you’ll typically get 8 scones from this recipe. Arrange the cut scones on your prepared baking sheet, leaving a little space between each one.
5. Brush and Bake to Golden Perfection
Once your scones are on the baking sheet, lightly brush the tops with a little extra heavy cream. This will give them a beautiful golden-brown sheen as they bake. You can also sprinkle a little extra sugar on top if you like a sweeter crust. Place the baking sheet in your preheated oven and bake for 15 to 20 minutes, or until the scones are puffed, golden brown, and a toothpick inserted into the center comes out clean. The exact baking time will depend on your oven and the size of your scones. Keep an eye on them towards the end of the baking time to prevent them from over-browning.
Allow the scones to cool on the baking sheet for a few minutes before transferring them to a wire rack to cool further. They are best enjoyed warm, but they also keep well at room temperature for a day or two. Serve them plain, with clotted cream and jam, or your favorite toppings. Enjoy your delicious homemade scones!
Conclusion:
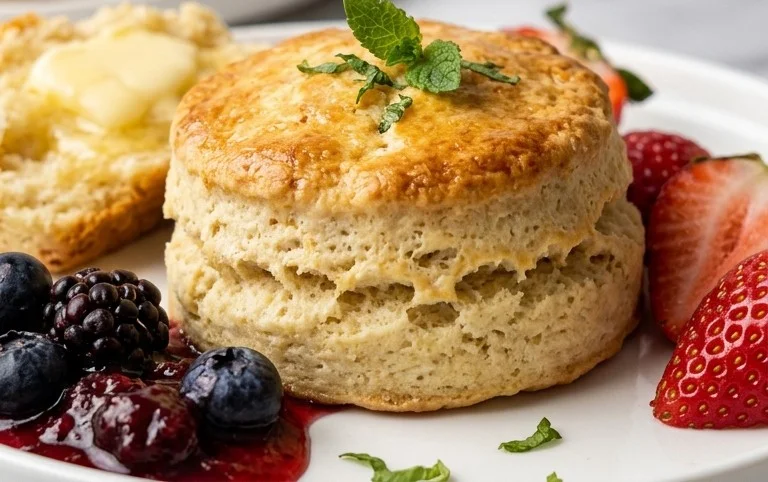
There you have it! My foolproof Scones Recipe, perfect for any occasion. These scones are wonderfully tender with a satisfyingly crisp exterior, making them an absolute delight to bake and even better to eat. They are incredibly versatile, and I truly believe this recipe offers the perfect balance of simplicity and deliciousness, making it a fantastic starting point for both novice and experienced bakers.
Enjoy them warm, fresh from the oven, with a generous dollop of clotted cream and your favorite jam for a classic afternoon tea experience. They also pair beautifully with a cup of strong tea or coffee. Don’t be afraid to get creative! Consider adding fresh berries like blueberries or raspberries to the dough, or perhaps some chocolate chips for a sweeter treat. A sprinkle of cinnamon or a hint of lemon zest can also elevate the flavor profile wonderfully. I wholeheartedly encourage you to give this Scones Recipe a try; I’m confident you’ll be delighted with the results!
Frequently Asked Questions:
Why are my scones tough?
Tough scones are often the result of overmixing the dough or overworking it after adding the liquid. Once the wet ingredients are incorporated, mix just until they come together. Gentle handling is key to tender scones.
Can I make scones ahead of time?
You can prepare the dry ingredients and cut in the butter a day in advance and store them in the refrigerator. Mix in the wet ingredients and bake just before serving for the best texture. Baked scones are best enjoyed the same day, but leftovers can be stored in an airtight container at room temperature.
What’s the best way to get a golden-brown top?
Brushing the tops of the scones with a little milk or egg wash before baking will help them achieve a beautiful golden-brown color and a slightly shinier finish. Ensure your oven temperature is accurate as well.
Classic Scones
Deliciously tender and buttery scones, perfect for breakfast or afternoon tea. Customize with your favorite mix-ins!
Ingredients
-
6 tablespoons unsalted butter
-
2 cups all-purpose flour
-
⅓ cup granulated sugar
-
1 tablespoon baking powder
-
½ teaspoon salt
-
½ cup plus 1 tablespoon heavy cream
-
1 large egg
-
up to 1 cup total mix-ins, as desired (e.g., 1 cup fresh blueberries)
Instructions
-
Step 1
Preheat oven to 400°F (200°C). Line a baking sheet with parchment paper. -
Step 2
In a large bowl, whisk together flour, sugar, baking powder, and salt. -
Step 3
Cut in the cold butter using a pastry blender or your fingertips until the mixture resembles coarse crumbs. -
Step 4
In a separate small bowl, whisk together the heavy cream and the lightly beaten egg. -
Step 5
Pour the wet ingredients into the dry ingredients and mix until just combined. Do not overmix. -
Step 6
Gently fold in your desired mix-ins. -
Step 7
Turn the dough out onto a lightly floured surface and gently pat into a 1-inch thick round. Cut into 8 wedges. -
Step 8
Place wedges on the prepared baking sheet. Brush tops with a little extra heavy cream. -
Step 9
Bake for 18-20 minutes, or until golden brown and cooked through.
Important Information
Nutrition Facts (Per Serving)
It is important to consider this information as approximate and not to use it as definitive health advice.
Allergy Information
Please check ingredients for potential allergens and consult a health professional if in doubt.