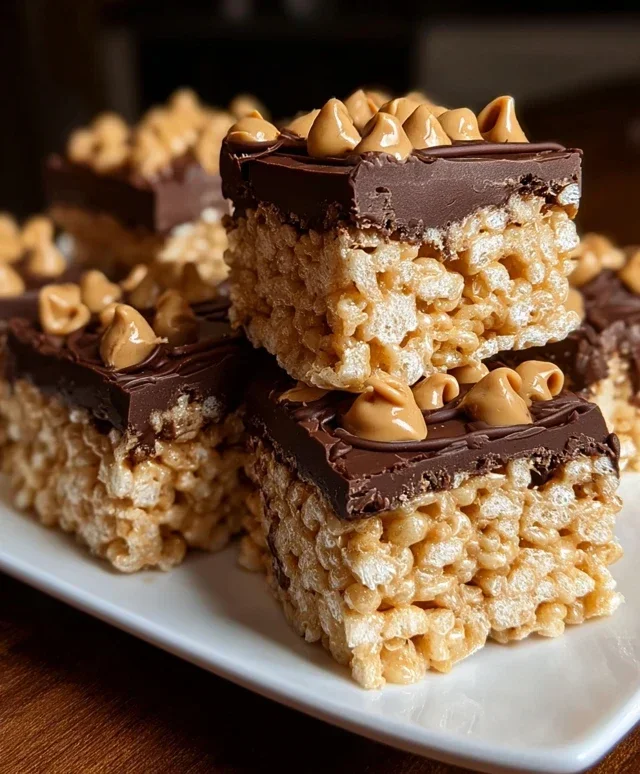
Chocolate Peanut Butter Rice Krispie Squares – Easy Recipe
Chocolate Peanut Butter Rice Krispie Squares are an absolute game-changer in the world of no-bake treats. Who can resist that irresistible combination of crispy, crunchy cereal, creamy peanut butter, and rich, decadent chocolate? It’s a flavor profile that evokes pure childhood joy and sophisticated indulgence all at once. We all have those classic comfort foods that just make everything feel a little brighter, and these Chocolate Peanut Butter Rice Krispie Squares are undeniably at the top of that list. What makes this particular iteration so special, you ask? It’s the perfect balance of textures and flavors, where the sweetness of the marshmallows perfectly complements the salty tang of peanut butter, all enveloped in a delightful cocoa hug. Get ready to elevate your snack game with this beloved classic!

Ingredients:
Get ready for a treat that’s as nostalgic as it is decadent! These Chocolate Peanut Butter Rice Krispie Squares are a delightful twist on a classic, combining the satisfying crunch of Rice Krispies with the irresistible duo of chocolate and peanut butter. They’re surprisingly easy to make, perfect for a quick dessert, a party centerpiece, or just a personal indulgence. The key is in the careful melting and mixing, ensuring every bite is packed with that classic chewy goodness and a delightful flavor punch. Let’s dive into creating these little squares of happiness.
Crafting Your Chocolate Peanut Butter Dream
The foundation of any great Rice Krispie square is the gooey, marshmallow-y base. We’re going to elevate this with the rich flavors of peanut butter and milk chocolate. The process is straightforward, but paying attention to a few details will make all the difference between a good square and a truly fantastic one.
The Gooey Marshmallow Base
First, let’s get our workspace ready. You’ll want to lightly grease a 9×13 inch baking pan with butter or cooking spray. This is crucial for preventing the sticky marshmallow mixture from adhering to the pan. You can also line it with parchment paper, leaving some overhang on the sides to help you lift the finished squares out easily.
Now, let’s talk about the melting process. In a large saucepan, melt the 1/4 cup of unsalted butter over low heat. It’s important to use low heat here. If the butter gets too hot, it can scorch and impart an unpleasant flavor to your squares. Once the butter is completely melted and just starting to shimmer, it’s time to add your marshmallows.
Add the 40 regular size marshmallows (or 1 ⅓ cups of mini marshmallows) to the saucepan. Continue to stir them gently over low heat. You’ll notice they start to soften and puff up. Keep stirring constantly until the marshmallows are completely melted and the mixture is smooth and creamy. Don’t rush this step! Overheating the marshmallows can make them tough and less elastic, resulting in harder squares. We want that perfect chewy texture.
Once the marshmallows are fully melted, remove the saucepan from the heat. This is where the magic happens! Immediately stir in the 1/2 cup of peanut butter. Mix it thoroughly until it’s completely incorporated into the marshmallow mixture, creating a smooth, swirl of peanut butter goodness. The residual heat from the marshmallows will help the peanut butter melt and blend seamlessly.
Incorporating the Crunch and Chocolatey Bliss
Now, it’s time to add the star of our cereal show: the 6 cups of Rice Krispie cereal. Add the cereal to the peanut butter and marshmallow mixture. Gently fold it in, using a spatula or a large spoon, until the cereal is evenly coated. The goal is to coat every single piece of cereal without crushing it. Take your time and be gentle; we want to preserve that satisfying crunch.
After you’ve got the cereal nicely coated, it’s time for the chocolate chips. Sprinkle the 1 cup of milk chocolate chips over the cereal mixture. You can either fold them in gently right away, allowing them to slightly melt and create pockets of chocolate within the squares, or you can reserve some to sprinkle on top for a more pronounced chocolatey finish. If you choose to fold them in, stir just enough to distribute them throughout.
Pressing and Setting for Perfection
Now, carefully spoon the mixture into your prepared 9×13 inch baking pan. This part can be a little sticky, so I find it helpful to lightly butter my hands or the back of a spoon. Gently press the mixture evenly into the pan. Avoid pressing too hard, as this can compact the cereal too much and make your squares dense. A light, even press is all you need to create a smooth, uniform surface.
If you decided to reserve some chocolate chips, now is the time to sprinkle them evenly over the top of the pressed mixture. You can also sprinkle on the optional chopped peanuts for an extra layer of texture and peanutty flavor.
Allow the squares to cool and set at room temperature for at least 30 minutes, or until firm. You can speed this up slightly by placing them in the refrigerator for about 15-20 minutes, but be aware that refrigerating for too long can sometimes make them a bit too hard. Once they’ve set, use the parchment paper overhang to lift the entire slab out of the pan, or cut them directly in the pan. Cut into squares or rectangles, and enjoy your homemade Chocolate Peanut Butter Rice Krispie Squares! They are best enjoyed fresh, but can be stored in an airtight container at room temperature for a few days.
Conclusion:
And there you have it – the ultimate guide to creating these undeniably delicious Chocolate Peanut Butter Rice Krispie Squares! This recipe is a winner because it’s incredibly simple, requiring minimal ingredients and no baking, yet delivers an explosion of classic, comforting flavors. The irresistible combination of chewy, crunchy cereal, creamy peanut butter, and rich chocolate makes them a surefire hit for any occasion, from quick snacks to impressive party treats. I truly encourage you to give this recipe a try; it’s so rewarding to whip up something so satisfying with such little effort.
These squares are wonderfully versatile. They’re fantastic on their own, but consider serving them as a delightful dessert alongside a glass of milk, or perhaps crum extractbled over ice cream for an extra layer of texture and flavor. For variations, don’t be afraid to get creative! You could stir in a handful of chocolate chips for an even more decadent experience, add a sprinkle of sea salt on top before the chocolate sets to enhance the sweet and salty profile, or even swirl in some caramel for a trifecta of indulgence. Whatever you choose, these Chocolate Peanut Butter Rice Krispie Squares are bound to become a new favorite.
Frequently Asked Questions:
Can I make these ahead of time?
Absolutely! These squares actually taste even better after they’ve had a little time for the flavors to meld, usually after a few hours or even overnight. Store them in an airtight container at room temperature for up to 3-4 days.
What kind of chocolate is best for drizzling?
You can use your favorite! Milk chocolate chips, semi-sweet chocolate chips, or even dark chocolate chips work wonderfully. If you want a smoother drizzle, you can add a teaspoon of vegetable oil or coconut oil to the melted chocolate before drizzling.
Are there any nut-free variations?
Yes! For a nut-free option, you can substitute sunflower seed butter or a tahini-based spread for the peanut butter. Just be aware that the flavor profile will change slightly.
Chocolate Peanut Butter Rice Krispie Squares
A delicious no-bake treat combining the classic Rice Krispie square with the irresistible duo of chocolate and peanut butter.
Ingredients
-
6 cups Rice Krispie cereal
-
½ cup peanut butter
-
¼ cup unsalted butter
-
40 regular size marshmallows
-
1 cup milk chocolate chips
-
Optional: chopped peanuts for garnish
Instructions
-
Step 1
Grease a 9×13 inch pan with butter or cooking spray. -
Step 2
In a large saucepan, melt butter over low heat. -
Step 3
Add marshmallows and stir until completely melted and smooth. -
Step 4
Remove from heat and stir in peanut butter until well combined. -
Step 5
Add Rice Krispie cereal and stir until coated. -
Step 6
Press mixture evenly into the prepared pan. -
Step 7
Melt milk chocolate chips in a microwave-safe bowl in 30-second intervals, stirring between each, until smooth. -
Step 8
Drizzle melted chocolate over the Rice Krispie mixture. Sprinkle with optional chopped peanuts if desired. -
Step 9
Let stand at room temperature for at least 30 minutes to set before cutting.
Important Information
Nutrition Facts (Per Serving)
It is important to consider this information as approximate and not to use it as definitive health advice.
Allergy Information
Please check ingredients for potential allergens and consult a health professional if in doubt.