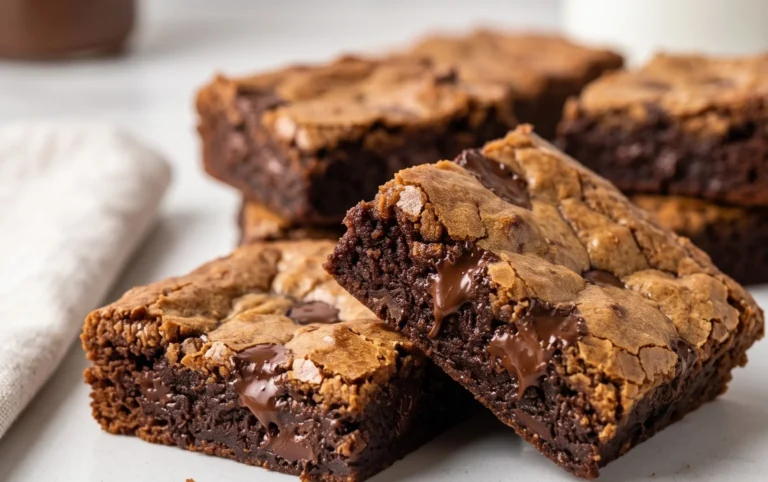
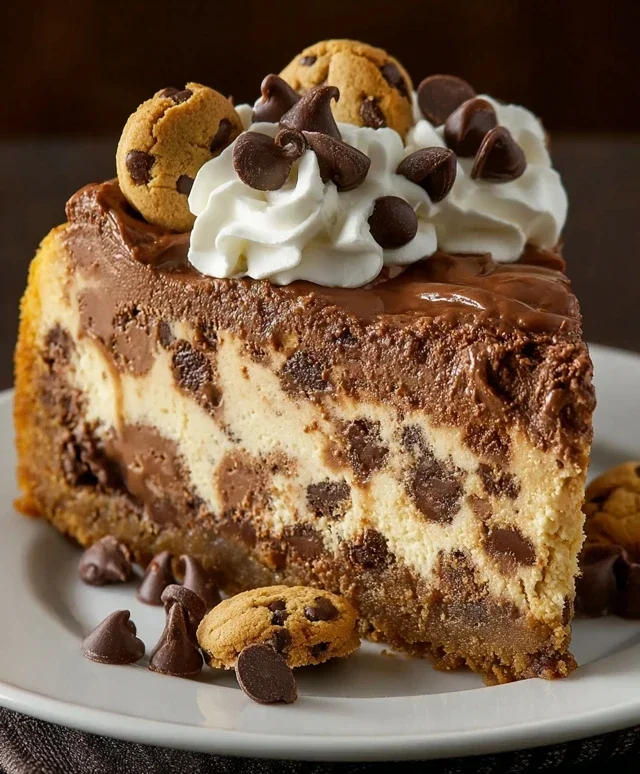
Chocolate Chip Cookie Cheesecake-Best Dessert Ever
Chocolate chip cookie bottomed cheesecake is the ultimate indulgence, a dessert that marries two of our most beloved treats into one glorious creation. Why do we go wild for this heavenly combination? It’s simple: the comforting, familiar sweetness of a perfectly baked chocolate chip cookie meets the rich, decadent creaminess of a classic cheesecake. This isn’t just any dessert; it’s a textural masterpiece. Imagin extracte sinking your fork through a tender, chewy cookie crust, its golden edges giving way to a silken smooth, tangy cheesecake filling. The warm, melty chocolate chips scattered throughout the cookie base add bursts of pure joy with every bite. It’s a celebration of contrasts, a symphony of flavors that guarantees a standing ovation from anyone lucky enough to try it. Get ready to elevate your dessert game with this show-stopping Chocolate Chip Cookie Bottomed Cheesecake!
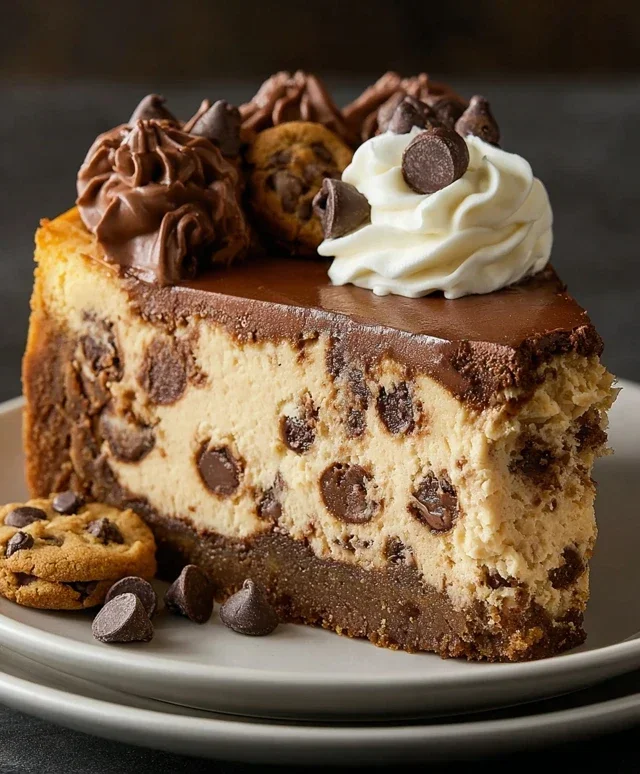
Chocolate Chip Cookie Bottomed Cheesecake
There are few desserts that inspire pure, unadulterated joy quite like a classic cheesecake. And then, there are those moments when you think, “What if we could make it even better?” Enter the Chocolate Chip Cookie Bottomed Cheesecake. This isn’t just a cheesecake; it’s an experience. Imagin extracte the warm, gooey comfort of a perfectly baked chocolate chip cookie, forming a delightful base for a rich, velvety smooth cheesecake filling. It’s a harmonious marriage of two beloved desserts, and I’m so excited to share this recipe with you. Get ready to impress yourself and everyone you share this with!
Ingredients:
The Perfect Cookie Base
The foundation of this decadent dessert is a robust yet tender chocolate chip cookie crust. We’re not talking about a crum extractb crust here; we’re talking about a real, bake-from-scratch cookie that provides a satisfying chew and a rich flavor.
1. Cream the Butter and Sugars: In a medium bowl, cream together the softened unsalted butter, light brown sugar, and granulated sugar until the mixture is light and fluffy. This is where you build the flavor and texture of your cookie base. The brown sugar will lend a lovely caramel note and a bit of chegrape juicess, while the granulated sugar provides sweetness and structure. Spend a good couple of minutes on this step, using an electric mixer or a sturdy whisk. Make sure there are no large lumps of butter remaining.
2. Add the Wet Ingredients: Beat in the egg and 1 1/2 teaspoons of vanilla extract until well combined. It might look a little separated at first, but keep beating, and it will come together into a smooth, glossy mixture. This is crucial for ensuring all the ingredients are evenly distributed, leading to a consistent cookie texture.
3. Combine the Dry Ingredients and Incorporate: In a separate small bowl, whisk together the all-purpose flour, baking soda, baking powder, and salt. Gradually add the dry ingredients to the wet ingredients, mixing on low speed (or by hand) until just combined. Be careful not to overmix the dough at this stage, as it can develop the gluten too much, resulting in a tough cookie. Once the flour is mostly incorporated, gently fold in the 211g of semi-sweet chocolate chips. You want to see those delicious pockets of melted chocolate throughout the dough.
4. Form the Cookie Crust: Press this cookie dough evenly into the bottom of a 9-inch springform pan. You want a solid, even layer that will hold its shape during baking. You can use the back of a spoon or your hands to press it down firmly. Don’t worry if it’s not perfectly smooth; a slightly rustic look is part of the charm. Bake the cookie base in a preheated oven at 350°F (175°C) for about 12-15 minutes, or until it’s lightly golden brown around the edges. The goal is to par-bake it, so it’s set but not fully cooked. Let this cookie crust cool completely in the pan on a wire rack while you prepare the cheesecake filling. This cooling step is essential to prevent the cheesecake filling from sinking into the warm cookie.
The Silky Chocolate Cheesecake Filling
Now for the star of the show: the creamy, dreamy cheesecake filling. We’re infusing it with a hint of cocoa for an extra layer of chocolatey goodness that complements the cookie base perfectly.
1. Beat the Cream Cheese and Sugar: In a large bowl, beat the softened cream cheese until it’s completely smooth and lump-free. This is the most important step for a silky cheesecake. If your cream cheese isn’t at room temperature, it’s much harder to get it smooth. Scrape down the sides of the bowl frequently to ensure everything is incorporated. Then, gradually beat in the 104g of sugar until well combined and smooth.
2. Incorporate Cocoa and Vanilla: Add the natural unsweetened cocoa powder and 1 teaspoon of vanilla extract to the cream cheese mixture. Beat until the cocoa is fully incorporated and you have a beautifully uniform chocolate-hued batter. Again, scrape down the sides of the bowl to make sure there are no dry pockets of cocoa.
3. Add Melted Chocolate and Finish: Gently fold in the 42g of melted semi-sweet chocolate chips. Stir just until the chocolate is marbled through the filling. You don’t want to overmix here; a few swirls of melted chocolate add a lovely visual appeal and pockets of intense chocolate flavor.
Assembling and Baking the Masterpiece
With our cookie base cooled and our filling ready, it’s time to bring it all together.
1. Pour and Smooth: Carefully pour the chocolate cheesecake filling over the cooled chocolate chip cookie base in the springform pan. Use an offset spatula or the back of a spoon to gently spread the filling evenly, creating a smooth surface. Try to avoid pressing down too hard to prevent disturbing the cookie base.
2. The Water Bath Method (Optional but Recommended): To ensure a perfectly smooth and crack-free cheesecake, I highly recommend using a water bath. Wrap the outside of your springform pan tightly with heavy-duty aluminum foil, making sure to create a good seal so no water seeps in. Place the foil-wrapped pan inside a larger baking pan. Carefully pour hot water into the larger pan until it comes about halfway up the sides of the springform pan. This gentle, moist heat helps the cheesecake bake evenly and prevents it from drying out or cracking.
3. Bake to Perfection: Bake the cheesecake in the preheated oven at 325°F (160°C) for approximately 60-75 minutes, or until the edges are set and the center is still slightly jiggly. The residual heat will continue to cook the cheesecake as it cools. Once baked, carefully remove the springform pan from the water bath (if used) and let it cool on a wire rack for about 1 hour.
4. Chill for Optimal Texture: Once the cheesecake has cooled at room temperature, cover it loosely with plastic wrap and refrigerate for at least 6-8 hours, or preferably overnight. This chilling time is crucial for the cheesecake to set properly and develop its signature dense, creamy texture. Patience is key here; you’ll be rewarded with the most incredible result!
5. Serve and Enjoy: When you’re ready to serve, carefully run a thin knife around the edge of the springform pan before releasing the sides. Slice with a sharp knife dipped in hot water for clean cuts. Garnish with extra chocolate chips, a drizzle of chocolate sauce, or a dollop of whipped cream if desired. Get ready for pure bliss with every bite!
Conclusion:
There you have it – a truly decadent Chocolate Chip Cookie Bottomed Cheesecake that’s sure to become a new favorite! This recipe is brilliant because it perfectly marries the creamy, tangy delight of cheesecake with the comforting, chewy goodness of a chocolate chip cookie base. It’s the best of both worlds, offering a textural contrast that’s simply irresistible. I love how this dessert can be dressed up or down. For a truly special occasion, consider topping it with a drizzle of salted caramel, a dollop of whipped cream, or even some fresh berries. For a simpler yet equally delicious experience, a sprinkle of extra chocolate chips or a dusting of cocoa powder works wonders.
Don’t be intimidated! This Chocolate Chip Cookie Bottomed Cheesecake is achievable for bakers of all levels. Give it a try; I promise you won’t be disappointed. The rich chocolate and cream cheese combination is a classic for a reason, and this creative twist elevates it to new heights. Experiment with different types of chocolate chips – dark, milk, or even white chocolate – or add a hint of espresso powder to the cookie base for an extra layer of flavor. I can’t wait for you to experience this amazing dessert!
Frequently Asked Questions:
Can I make this cheesecake ahead of time?
Absolutely! Cheesecakes actually benefit from chilling. I recommend making it the day before you plan to serve it to allow the flavors to meld and the texture to set perfectly. Just be sure to cover it tightly to prevent it from absorbing odors in the refrigerator.
What kind of chocolate chips are best for the cookie bottom?
You can use your favorite kind! Semi-sweet chocolate chips are a classic choice and provide a balanced sweetness. If you prefer a richer flavor, dark chocolate chips are wonderful. For something a little sweeter, milk chocolate chips work well too. Some people even like to mix a couple of different types for extra complexity.
Chocolate Chip Cookie Bottomed Cheesecake
A decadent cheesecake featuring a rich chocolate chip cookie crust and a creamy, chocolatey cheesecake filling.
Ingredients
-
112g unsalted butter, room temperature
-
72g light brown sugar
-
39g sugar
-
1 egg
-
1 1/2 tsp vanilla extract
-
195g all-purpose flour
-
3/4 tsp baking soda
-
1/4 tsp baking powder
-
1/4 tsp salt
-
211g semi-sweet chocolate chips
-
565g cream cheese, room temperature
-
104g sugar
-
35g natural unsweetened cocoa powder
-
1 tsp vanilla extract
-
42g semi-sweet chocolate chips, melted
Instructions
-
Step 1
For the cookie crust: Cream together 112g unsalted butter, 72g light brown sugar, and 39g sugar. Beat in 1 egg and 1 1/2 tsp vanilla extract. -
Step 2
In a separate bowl, whisk together 195g all-purpose flour, 3/4 tsp baking soda, 1/4 tsp baking powder, and 1/4 tsp salt. Gradually add to the wet ingredients until combined. Stir in 211g semi-sweet chocolate chips. -
Step 3
Press the cookie dough evenly into the bottom of a 9-inch springform pan. Bake at 350°F (175°C) for 10-12 minutes, or until lightly golden. Let cool. -
Step 4
For the cheesecake filling: Beat 565g cream cheese until smooth. Gradually add 104g sugar and 35g natural unsweetened cocoa powder, mixing until well combined. -
Step 5
Beat in 1 tsp vanilla extract. Fold in the 42g melted semi-sweet chocolate chips. -
Step 6
Pour the cheesecake filling over the cooled cookie crust. Bake at 350°F (175°C) for 60-70 minutes, or until the edges are set and the center is slightly jiggly. -
Step 7
Turn off the oven and let the cheesecake cool in the oven with the door ajar for 1 hour. Remove from oven and cool completely on a wire rack. Chill in the refrigerator for at least 4 hours, or overnight, before serving.
Important Information
Nutrition Facts (Per Serving)
It is important to consider this information as approximate and not to use it as definitive health advice.
Allergy Information
Please check ingredients for potential allergens and consult a health professional if in doubt.