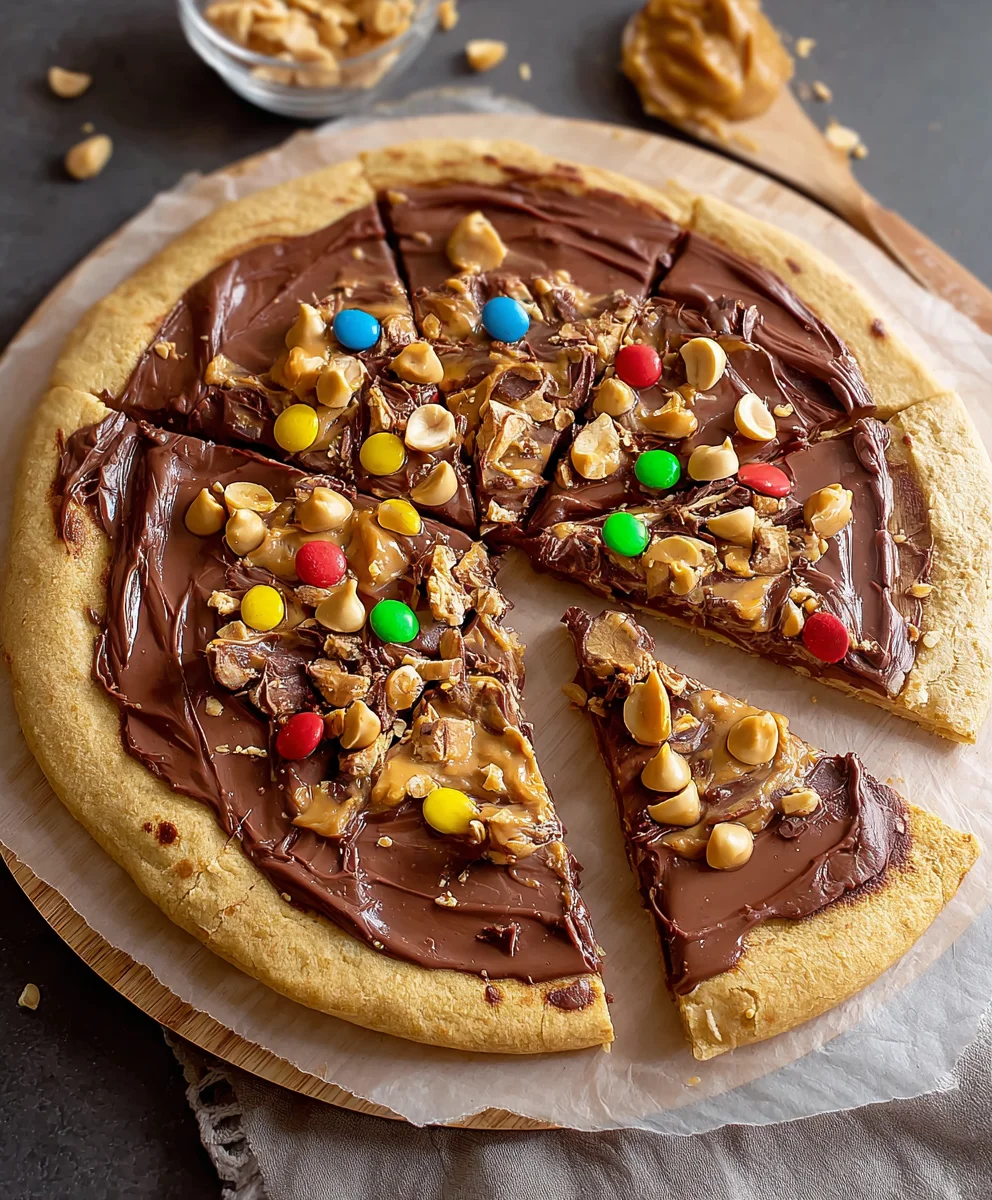
Decadent Chocolate Peanut Butter Pizza-Easy Dessert Recipe
Chocolate Peanut Butter Pizza is more than just a dessert; it’s a euphoric collision of two universally beloved flavors that ignites pure joy with every bite. Imagin extracte the decadent richness of warm, melted chocolate mingling with the salty, creamy indulgence of smooth peanut butter, all atop a perfectly baked, slightly chewy pizza crust. It’s the ultimate comfort food, a guaranteed crowd-pleaser for birthdays, casual get-togethers, or simply when that irresistible craving strikes. What makes this Chocolate Peanut Butter Pizza so special is its surprising simplicity and the sheer power of its flavor combination. It’s a delightful twist on a familiar favorite, offering an experience that’s both nostalgic and excitingly new. Get ready to embark on a delicious adventure that will have everyone asking for seconds!
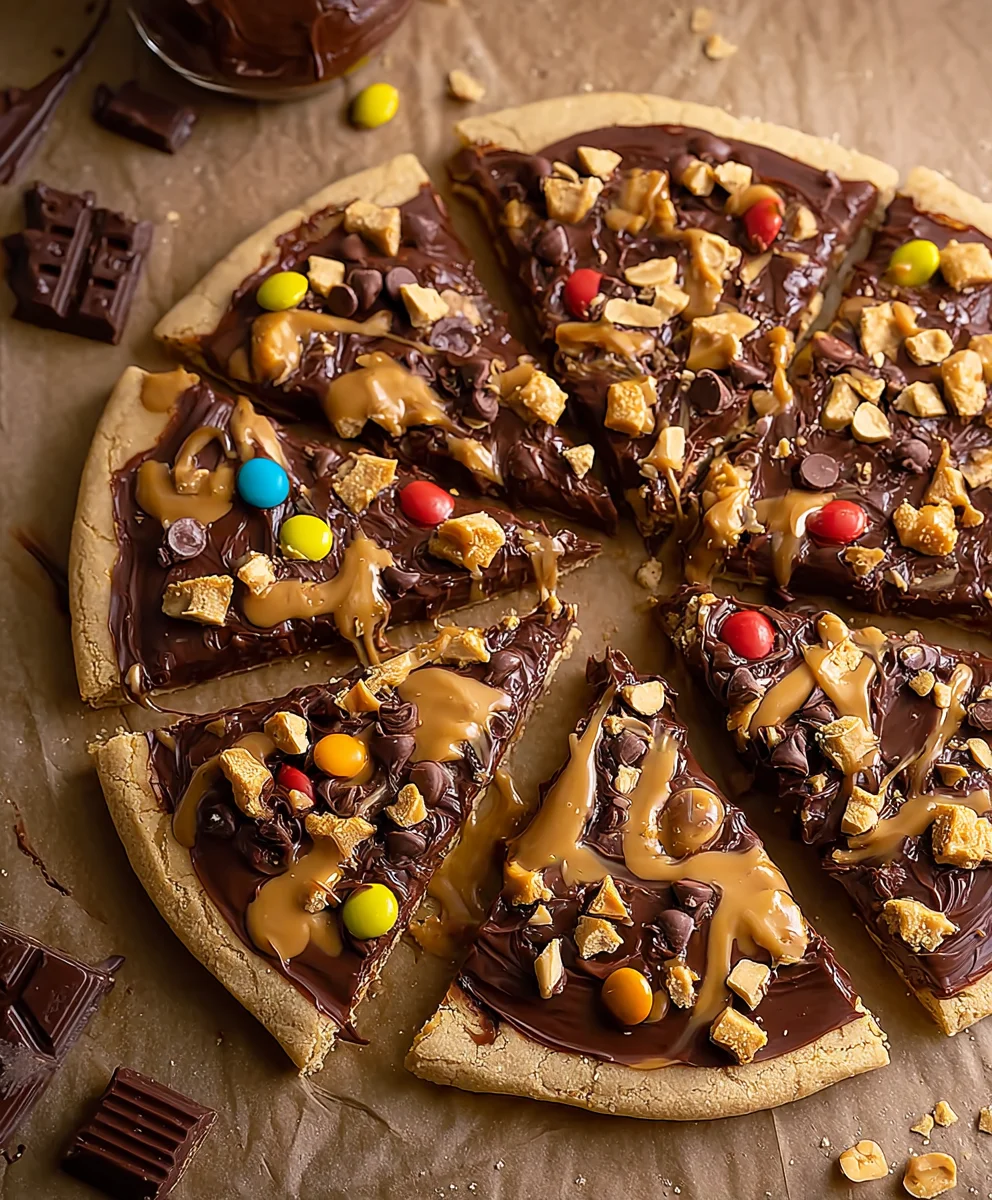
Ingredients:
- 1 (18-oz) roll refrigerated chocolate chip cookie dough
- 3/4 cup creamy peanut butter
- 1 cup semi-sweet chocolate morsels
- 1/2 cup bite-size chocolate peanut butter cups, roughly chopped
- 1/4 cup miniature candy-coated chocolate pieces
- 1/4 cup salted peanuts, chopped
- Chocolate sauce for drizzling (optional)
Preparing Your Chocolate Peanut Butter Pizza Base
Preheating the Oven and Dough Preparation
Begin extract by preheating your oven to 375 degrees Fahrenheit (190 degrees Celsius). This ensures the oven is at the perfect temperature to bake your cookie dough base evenly. Next, unroll the refrigerated chocolate chip cookie dough. You’ll want to handle this dough gently to avoid overworking it, which can lead to a tough crust. Carefully press the dough onto a greased baking sheet or a pizza pan. If you’re using a pizza pan, press the dough evenly into the bottom and slightly up the sides to create a nice border. This border will help contain the delicious toppings later. Aim for a thickness of about 1/4 inch all around. The goal here is to create a solid, evenly distributed foundation for our pizza. If the dough is too stiff to spread easily, let it sit at room temperature for just a few minutes to soften slightly. Don’t let it get too warm, or it will become sticky and difficult to manage.
Blind Baking the Cookie Dough Base
Once your cookie dough is spread into your desired pizza shape on the prepared baking surface, it’s time for a crucial step: blind baking. This means we’ll bake the cookie dough partially before adding any toppings. This helps to ensure the cookie base is fully cooked and firm enough to hold all the decadent toppings without becoming soggy. Place the baking sheet or pizza pan with the cookie dough into the preheated oven. Bake for approximately 10-12 minutes, or until the edges of the cookie dough are lightly golden brown and the center looks set but not yet fully cooked. Keep a close eye on it during this stage, as cookie dough can go from perfectly baked to burnt very quickly. The slight underbaking is intentional, as it will continue to cook once the toppings are added. Once this initial bake is complete, carefully remove the cookie dough base from the oven and let it cool on the baking sheet for about 5 minutes. This resting period allows it to firm up a bit more before we move on to the next layer of deliciousness.
Assembling Your Delectable Pizza
The Creamy Peanut Butter Layer
While the cookie dough base is still warm but slightly cooled, it’s time to spread on the creamy peanut butter. Take your 3/4 cup of creamy peanut butter and, using a spatula or the back of a spoon, spread it evenly over the surface of the partially baked cookie dough base. Make sure to go all the way to the edges, or close to them, to create a cohesive layer. This peanut butter layer acts as a fantastic binder for the subsequent toppings and adds an irresistible nutty flavor that perfectly complements the chocolate. If your peanut butter is a bit stiff, you can warm it very slightly in a microwave-safe bowl for about 10-15 seconds to make it more spreadable, but be careful not to overheat it. The warmth of the cookie dough will help it spread beautifully.
Adding the Chocolatey Goodness
Now for the true indulgence – the chocolate! Sprinkle the 1 cup of semi-sweet chocolate morsels evenly over the layer of peanut butter. Try to distribute them as uniformly as possible so that you get pockets of melted chocolate in every bite. Next, scatter the 1/2 cup of roughly chopped bite-size chocolate peanut butter cups over the semi-sweet chocolate morsels. The combination of melted morsels and the gooey chunks from the peanut butter cups will create an incredibly rich and satisfying chocolate experience. This is where the “chocolate peanut butter” part of our pizza truly shines.
The Final Toppings and Bake
With the chocolate morsels and peanut butter cup chunks in place, it’s time to add the remaining crunchy and colorful elements. Sprinkle the 1/4 cup of miniature candy-coated chocolate pieces over the top. These add a delightful textural contrast and a burst of color. Finally, distribute the 1/4 cup of chopped salted peanuts evenly across the pizza. The salt in the peanuts will beautifully balance the sweetness of the chocolate and peanut butter, enhancing all the flavors. Once all your toppings are artfully arranged, carefully return the pizza to the preheated oven. Bake for another 8-10 minutes, or until the chocolate morsels are melted and gooey, the peanut butter cups have softened, and the cookie dough edges are a deep golden brown. The goal is for everything to be melded together into a wonderfully decadent creation.
Finishing Touches and Serving
Once your Chocolate Peanut Butter Pizza is out of the oven, let it cool on the baking sheet for at least 10-15 minutes before attempting to slice it. This cooling period is essential for the toppings to set properly and for the cookie base to firm up completely, making it easier to cut and serve. If you’re feeling extra decadent, this is also the perfect time to add a drizzle of chocolate sauce over the top. This optional step adds another layer of visual appeal and an extra burst of chocolatey flavor. To serve, carefully slide a spatula under the pizza and transfer it to a cutting board. Cut into wedges using a sharp knife, just like a traditional pizza. Enjoy this unique and utterly delightful dessert pizza!
Conclusion:
And there you have it! Your very own delectable Chocolate Peanut Butter Pizza, ready to impress your taste buds and anyone lucky enough to share it. We’ve walked through each simple step, from creating that perfect sweet crust to layering on the irresistible chocolate and peanut butter goodness. This pizza is more than just a dessert; it’s a guaranteed crowd-pleaser, perfect for movie nights, birthday celebrations, or just an indulgent treat after a long week. Serve it warm for an extra gooey experience, or chilled for a firmer, sliceable delight. Don’t be afraid to get creative with toppings – a sprinkle of sea salt, some chopped peanuts, or even a drizzle of extra chocolate sauce can elevate your Chocolate Peanut Butter Pizza to new heights. We encourage you to try this recipe and make it your own. Happy baking!
Frequently Asked Questions:
Can I make the crust ahead of time?
Absolutely! You can prepare the pizza dough for your Chocolate Peanut Butter Pizza up to 2 days in advance. Store it in an airtight container in the refrigerator, and when you’re ready to bake, simply let it come to room temperature for about 30 minutes before shaping and topping.
What are some other topping ideas for my Chocolate Peanut Butter Pizza?
Beyond the classic chocolate chips and peanut butter, consider adding chopped Reese’s peanut butter cups, a swirl of caramel sauce, a scattering of M&Ms, or even some toasted marshmallows for a s’mores-inspired twist. A sprinkle of flaky sea salt is also a fantastic way to balance the sweetness.
Decadent Chocolate Peanut Butter Pizza
An easy and decadent dessert pizza featuring a chocolate chip cookie dough base, creamy peanut butter, melted chocolate, and peanut butter cups.
Ingredients
-
1 (18-oz) roll refrigerated chocolate chip cookie dough
-
3/4 cup creamy peanut butter
-
1 cup semi-sweet chocolate morsels
-
1/2 cup bite-size chocolate peanut butter cups, roughly chopped
-
1/4 cup miniature candy-coated chocolate pieces
-
1/4 cup salted peanuts, chopped
-
Chocolate sauce for drizzling (optional)
Instructions
-
Step 1
Preheat oven to 375°F (190°C). Gently press the refrigerated chocolate chip cookie dough onto a greased baking sheet or pizza pan, forming a 1/4-inch thick base with a slight border. Bake for 10-12 minutes, until edges are lightly golden brown. -
Step 2
Remove the cookie dough base from the oven and let cool for 5 minutes. While still warm, spread 3/4 cup of creamy peanut butter evenly over the surface. -
Step 3
Sprinkle 1 cup of semi-sweet chocolate morsels evenly over the peanut butter layer. Scatter 1/2 cup of roughly chopped bite-size chocolate peanut butter cups over the chocolate morsels. -
Step 4
Add the remaining toppings by sprinkling 1/4 cup of miniature candy-coated chocolate pieces and 1/4 cup of chopped salted peanuts evenly across the pizza. -
Step 5
Carefully return the pizza to the preheated oven and bake for another 8-10 minutes, or until chocolate morsels are melted and gooey, and the cookie dough edges are a deep golden brown. -
Step 6
Let the pizza cool on the baking sheet for at least 10-15 minutes before slicing. Drizzle with chocolate sauce if desired.
Important Information
Nutrition Facts (Per Serving)
It is important to consider this information as approximate and not to use it as definitive health advice.
Allergy Information
Please check ingredients for potential allergens and consult a health professional if in doubt.