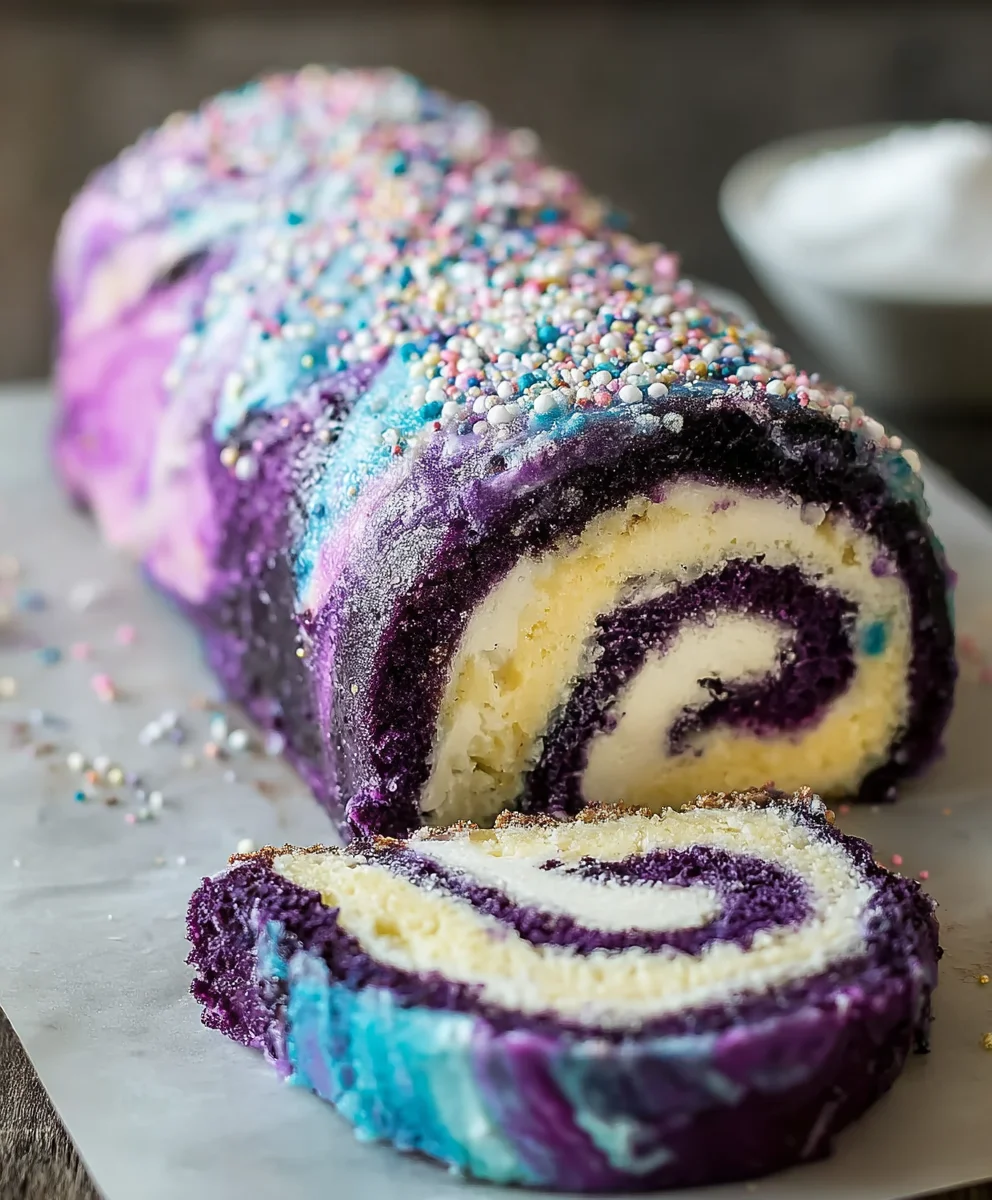
Rainbow Cheesecake Swirl Bars- Easy & Delicious Dessert
Rainbow Cheesecake Swirl Bars are more than just a dessert; they’re a vibrant celebration on a plate! We all have those go-to treats that bring instant smiles, and these delightful bars undoubtedly fall into that category. Imagin extracte a creamy, dreamy cheesecake base, swirled with ribbons of jewel-toned fruit flavors, creating a visual spectacle that’s as delightful to behold as it is to devour. People adore them because they offer a burst of colorful fun without sacrificing that classic, comforting cheesecake taste. What truly makes these Rainbow Cheesecake Swirl Bars special is the perfect balance of tangy fruitiness and rich, velvety cheesecake, all presented in an easy-to-share bar format. They’re perfect for parties, a weekend treat, or whenever you need a little dose of edible joy.
Ingredients:
- 1 box white cake mix
- 1/2 cup unsalted butter, melted
- 1 large egg
- 2/3 cup whole milk, plus an additional 9 teaspoons
- Gel food coloring in six vibrant shades: pink, orange, yellow, green, blue, and purple
- 12 ounces cream cheese, fully softened to room temperature (this is typically 1-1/2 standard blocks)
- 1/3 cup granulated sugar
- 1 large egg
- 1 teaspoon pure vanilla extract
Preparing the Base
Mixing the Cake Batter
Let’s start by crafting the foundation for our delightful Rainbow Cheesecake Swirl Bars. In a medium-sized mixing bowl, combine the entire box of white cake mix with the 1/2 cup of melted butter. To this, add 1 large egg and the 2/3 cup of milk. You’ll want to mix these ingredients together until they are just combined. Be careful not to overmix; a few small lumps are perfectly fine and will actually contribute to a tender crum extractb. Overmixing can develop the gluten in the flour too much, resulting in a tougher cake layer. Once the batter is ready, spread it evenly into a 9×13 inch baking pan that has been lightly greased and floured, or lined with parchment paper for easier removal later.
Crafting the Cream Cheese Swirl
Creaming the Cheese and Sugar
Now, for the star of the show – the luscious cream cheese swirl! In a separate, larger mixing bowl, place your softened cream cheese. It’s crucial that the cream cheese is truly at room temperature. If it’s still cold, it will be difficult to get it smooth and lump-free, which can negatively impact the texture of your swirl. Add the 1/3 cup of granulated sugar and 1 large egg to the cream cheese. Using an electric mixer (handheld or stand mixer with the paddle attachment), beat these ingredients together on medium speed until the mixture is completely smooth, creamy, and well combined. You should scrape down the sides of the bowl periodically to ensure everything is incorporated evenly. No one likes pockets of unmixed cream cheese!
Adding Flavor and Dividing
Next, stir in the 1 teaspoon of pure vanilla extract into the cream cheese mixture. Vanilla enhances the creamy flavor and adds a wonderful aroma. Once the vanilla is mixed in, this is where the magic of our Rainbow Cheesecake Swirl Bars truly begin extracts to take shape. We need to divide this cream cheese mixture into six equal portions, one for each of our vibrant gel food colors. You can do this by eye, or for precision, use a kitchen scnon-alcoholic ale. Once divided, place each portion into a separate small bowl or resealable bag.
Coloring the Swirls
Achieving Vibrant Hues
Now it’s time to bring the rainbow to life! To each of the six small bowls (or bags), add a small amount of one of the gel food colors: pink, orange, yellow, green, blue, and purple. Gel food colors are ideal because they are highly concentrated and won’t add excess liquid to your cream cheese mixture, which could affect its texture. Start with a drop or two and mix thoroughly until the color is evenly distributed. If you desire a more intense shade, add another drop of color and mix again. Continue this process for all six colors, ensuring each portion is vibrantly colored. Remember to use a clean spoon or spatula for each color to avoid muddying the shades.
Creating the Swirl Effect
Layering the Colors
With your six beautifully colored cream cheese mixtures ready, it’s time to create the signature swirl. Carefully dollop spoonfuls of each colored cream cheese mixture randomly over the cake batter base in the prepared pan. Don’t try to be too neat; the random placement is key to a beautiful swirl effect. Alternate colors as you go, covering the entire surface of the cake batter. You want a good distribution of all the colors for a truly spectacular rainbow.
Swirling the Colors Together
Once all the colored cream cheese dollops are in place, it’s time to create the swirls. Take a toothpick, skewer, or the tip of a knife and gently drag it through the cream cheese and cake batter. Create sweeping motions, weaving back and forth across the pan. You can make figure-eights, S-shapes, or more abstract patterns. The goal is to marble the colors together without overmixing them into a single muddy hue. A few gentle passes are all you need. If you over-swirl, your distinct colors will blend too much. Remember, less is often more when it comes to creating a beautiful marbled effect. You want distinct ribbons of color!
Baking and Chilling
Baking the Bars
Preheat your oven to 325 degrees Fahrenheit (160 degrees Celsius). Place the assembled pan into the preheated oven and bake for approximately 30 to 40 minutes. You’ll know the Rainbow Cheesecake Swirl Bars are ready when the edges are set and lightly golden brown, and the center is mostly set but still has a slight wobble. A toothpick inserted into the center should come out mostly clean, withrum extractist crumbs attached, but not wet batter. Avoid overbaking, as this can make the cheesecake layer dry and rubbery.
Cooling and Setting
Once baked, carefully remove the pan from the oven and place it on a wire cooling rack. Let the bars cool completely in the pan at room temperature. This is a critical step for the cheesecake layer to set properly. Once they have cooled to room temperature, cover the pan loosely with plastic wrap and refrigerate for at least 4 hours, or preferably overnight. This chilling time is essential for the bars to firm up enough to be cut cleanly and to allow the flavors to meld. Trying to cut them before they are fully chilled will result in a messy, soft bar.
Slicing and Serving
After the chilling period, your Rainbow Cheesecake Swirl Bars should be perfectly firm and ready to slice. For clean cuts, use a sharp knife that has been dipped in hot water and wiped dry between each cut. This will prevent the knife from sticking gin extract dragging the creamy layers. Slice the bars into your desired size – squares or rectangles work well. Serve these delightful bars chilled and enjoy the vibrant bursts of color and delicious creamy cheesecake layered over a tender cake base!

Conclusion:
And there you have it – your very own batch of vibrant and utterly delicious Rainbow Cheesecake Swirl Bars! We hope you enjoyed the process of creating these colorful delights as much as we did. These bars are a guaranteed crowd-pleaser, perfect for birthdays, holidays, or simply as a cheerful treat to brighten any day. Their creamy cheesecake filling, swirled with bright, fruity flavors, offers a delightful contrast to the buttery, crum extractbly crust. Don’t be afraid to get creative!
For serving suggestions, these bars are fantastic on their own, chilled to perfection. They also pair beautifully with a dollop of fresh whipped cream or a scattering of fresh berries. If you’re looking to experiment with variations, consider adding a touch of citrus zest to the cheesecake batter for an extra zing, or even experimenting with different fruit extracts for a unique flavor profile. The possibilities are truly endless with these Rainbow Cheesecake Swirl Bars. So go ahead, bake them, share them, and most importantly, enjoy every single bite!
Frequently Asked Questions about Rainbow Cheesecake Swirl Bars:
Q1: Can I make the Rainbow Cheesecake Swirl Bars ahead of time?
Absolutely! The Rainbow Cheesecake Swirl Bars are ideal for making in advance. In fact, they often taste even better after chilling overnight, allowing the flavors to meld together beautifully. Store them in an airtight container in the refrigerator for up to 3-4 days.
Q2: What kind of food coloring is best for the rainbow effect?
We recommend using gel food coloring for the most vibrant and concentrated colors. Liquid food coloring can add too much moisture to the cheesecake batter, potentially affecting its texture. Start with a small amount of gel coloring and add more until you achieve your desired shade for each swirl.
Rainbow Cheesecake Swirl Bars
Easy and delicious dessert bars featuring a tender cake base swirled with vibrant, colorful cream cheese.
Ingredients
-
1 box white cake mix
-
1/2 cup unsalted butter, melted
-
1 large egg
-
2/3 cup whole milk, plus an additional 9 teaspoons
-
Gel food coloring in six vibrant shades: pink, orange, yellow, green, blue, and purple
-
12 ounces cream cheese, fully softened
-
1/3 cup granulated sugar
-
1 large egg
-
1 teaspoon pure vanilla extract
Instructions
-
Step 1
Prepare the cake batter by combining white cake mix, melted butter, 1 egg, and 2/3 cup milk in a bowl. Mix until just combined. Spread evenly into a greased 9×13 inch baking pan. -
Step 2
In a separate bowl, beat softened cream cheese, granulated sugar, and 1 egg until smooth. Stir in vanilla extract. -
Step 3
Divide the cream cheese mixture into six equal portions. Add a small amount of each gel food color (pink, orange, yellow, green, blue, purple) to each portion and mix until vibrantly colored. -
Step 4
Dollop spoonfuls of each colored cream cheese mixture randomly over the cake batter in the pan, alternating colors. -
Step 5
Gently swirl the colors together using a toothpick or skewer, creating a marbled effect. Avoid overmixing. -
Step 6
Bake in a preheated oven at 325°F (160°C) for 30-40 minutes, until the edges are set and the center is mostly set with a slight wobble. -
Step 7
Let the bars cool completely in the pan at room temperature, then cover and refrigerate for at least 4 hours, or overnight, until firm. -
Step 8
Slice the chilled bars with a sharp knife dipped in hot water for clean cuts. Serve chilled.
Important Information
Nutrition Facts (Per Serving)
It is important to consider this information as approximate and not to use it as definitive health advice.
Allergy Information
Please check ingredients for potential allergens and consult a health professional if in doubt.