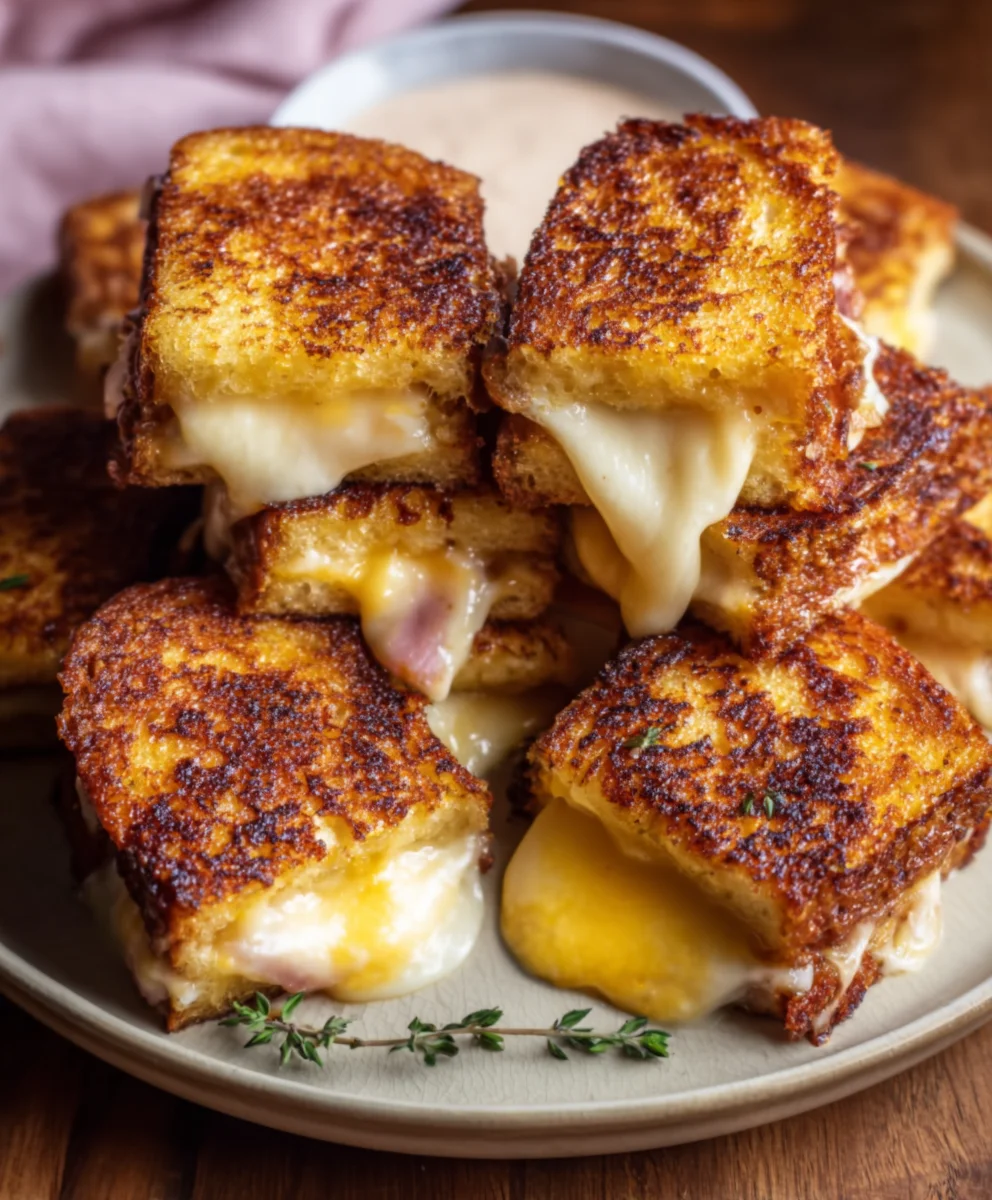
Hawaiian Roll Grilled Cheese – Ultimate Comfort Food
Hawaiian Roll Grilled Cheese promises a delightful twist on a beloved classic, offering a symphony of sweet and savory flavors that will transport your taste buds straight to an island paradise. If you’re searching for a quick, comforting meal that’s both fun and incredibly delicious, look no further. The magic of a Hawaiian Roll Grilled Cheese lies in its irresistible texture combination: the pillowy, slightly sweet embrace of the Hawaiian rolls perfectly complements the gooey, melted cheese within. It’s the kind of dish that instantly brings a smile to your face, evoking feelings of nostalgia and pure culinary joy. What truly sets this rendition apart is the unique balance achieved by the subtle sweetness of the rolls, which caramelizes beautifully under the heat, creating a depth of flavor that a standard slice of bread simply can’t replicate. Get ready to discover your new favorite comfort food!
Ingredients:
- 4 Hawaiian rolls
- 1 cup shredded Monterey Jack cheese
- 2 tablespoons unsalted butter
- Optional: Sliced tomatoes or crispy beef beef bacon
Preparing Your Hawaiian Roll Grilled Cheese
Getting Started with the Rolls
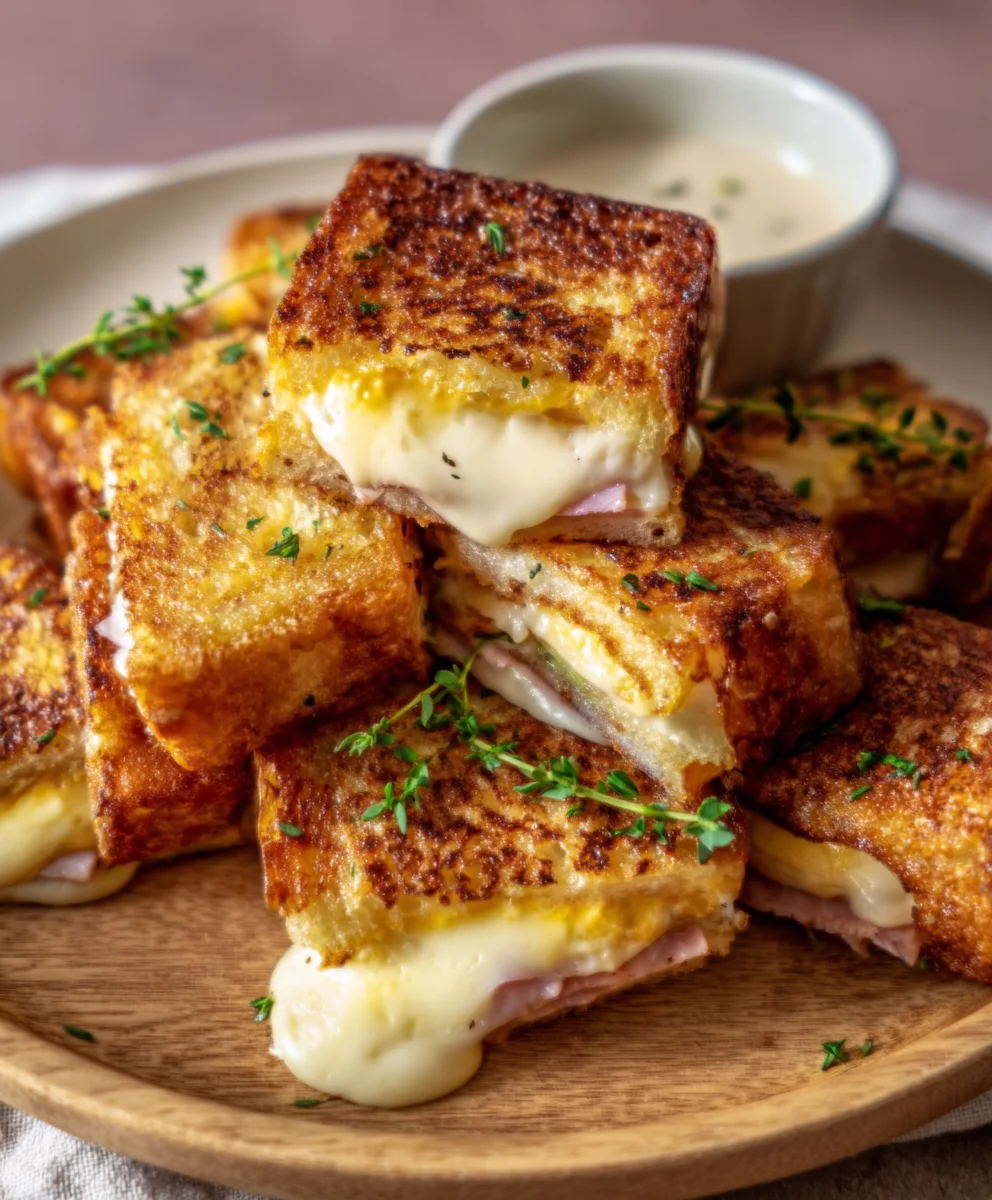
The foundation of our delicious Hawaiian Roll Grilled Cheese is the sweet and soft Hawaiian rolls. These little buns offer a delightful counterpoint to the savory cheese and buttery exterior. First, take your four Hawaiian rolls and carefully slice them horizontally, just as you would a regular beef hamburger bun. You want to create a top and bottom half for each sandwich. I find it easiest to use a serrated bread knife for this, as it cuts through the soft rolls without squishing them. Set these aside for a moment as we prepare the star of the show – the cheese.
The Cheesy Delight
We’re using Monterey Jack cheese for its excellent melting properties and mild, creamy flavor that pairs wonderfully with the sweetness of the Hawaiian rolls. Measure out one cup of your shredded Monterey Jack cheese. If you’ve purchased a block, now is the time to shred it. Freshly shredded cheese melts more evenly and tastes better than pre-shredded varieties, which often contain anti-caking agents that can affect the texture. Ensure the cheese is evenly distributed so you don’t end up with pockets of plain bread.
Assembling and Grilling the Sandwiches
Layering the Cheese
Now, let’s build these mini masterpieces. Take the bottom half of each sliced Hawaiian roll and generously sprinkle about a quarter cup of the shredded Monterey Jack cheese onto each one. Try to spread the cheese as evenly as possible, going close to the edges. This will ensure that when the cheese melts, it creates a beautiful, gooey seal around the sandwich. If you’re adding any optional ingredients like sliced tomatoes or crispy beef baconbacon, you can place a few slices or a smallbeef baconr of bacon on top of the cheese at this stage. This will get nestled right into the melty cheese. Once you’ve layered the cheese (and any extras) on all four bottom halves, place the top halves of the rolls back onto them, gently pressing down.
Butter for Browning
The key to that perfect, golden-brown crust on our Hawaiian Roll Grilled Cheese is good old butter. Take your two tablespoons of unsalted butter and let it soften slightly at room temperature. This will make it much easier to spread. Once softened, divide the butter and spread a thin, even layer over the top of each assembled sandwich. Make sure to get butter all the way to the edges. This butter will not only contribute to a beautiful golden color but also add a rich flavor and a delightful crispness to the exterior of the rolls. You can also butter the bottoms of the sandwiches if you prefer, but buttering the top is usually sufficient for a great result.
The Sizzle and Melt
Heat a non-stick skillet or griddle over medium-low heat. It’s important not to have the heat too high, as this can burn the outside of the rolls before the cheese has a chance to fully melt. Place your buttered sandwiches onto the heated skillet. You should hear a gentle sizzle. Cook for approximately 3 to 5 minutes on the first side, or until the bottom is beautifully golden brown and the cheese is starting to soften and melt around the edges. Keep an eye on them to prevent burning. If the butter starts to brown too quickly, reduce the heat slightly.
Flipping and Finishing
Once the first side is perfectly golden, it’s time to flip. Carefully use a spatula to lift and flip each sandwich. You might see some cheese oozing out – that’s a good sign! Continue to cook on the second side for another 3 to 5 minutes, or until it’s also golden brown and the cheese is completely melted and gooey throughout. You can gently press down on the sandwiches with your spatula while they cook to help the cheese melt evenly and create a more compact sandwich. If your cheese isn’t quite melted enough by the time the bread is golden, you can cover the skillet with a lid for a minute or two to trap heat and encourage further melting. This is a great trick for ensuring maximum cheesiness! Serve these warm for the ultimate Hawaiian Roll Grilled Cheese experience.
Conclusion:
There you have it – the ultimate guide to crafting the perfect Hawaiian Roll Grilled Cheese! This recipe elevates a classic comfort food into something truly special with the subtle sweetness and pillowy texture of Hawaiian rolls. The rich, melty cheese combined with the buttery, toasted exterior creates an irresistible bite that’s both familiar and exciting. I hope you enjoy making and devouring this delightful sandwich as much as I do!
For serving suggestions, this Hawaiian Roll Grilled Cheese is fantastic on its own as a quick lunch or a satisfying snack. It also pairs wonderfully with a side of tomato soup for a classic combination, or a fresh green salad to balance the richness. Don’t be afraid to experiment with variations! You can add a thin slice of beef ham or turkey for a more substantial sandwich, or a spread of fig jam for an extra layer of sweet and savory complexity. A sprinkle of red pepper flakes can add a nice kick for those who enjoy a little heat.
Give this Hawaiian Roll Grilled Cheese recipe a try and let its delicious simplicity win you over. I encourage you to get creative in the kitchen and make it your own!
Frequently Asked Questions:
Can I use different types of cheese?
Absolutely! While cheddar is a classic choice and melts beautifully, feel free to explore other cheeses. Gruyere, Monterey Jack, Provolone, or a blend of your favorites would also be delicious in this Hawaiian Roll Grilled Cheese.
What’s the best way to get a perfectly golden-brown crust?
The key is medium-low heat and patience. Ensure your pan is heated evenly before adding the sandwich. Buttering the outside of the Hawaiian rolls generously and cooking them slowly will allow the cheese to melt thoroughly while achieving that beautiful golden-brown crust without burning.
Can I make these ahead of time?
While a freshly made Hawaiian Roll Grilled Cheese is at its best, you can assemble them ahead of time and grill them just before serving. The bread might absorb some moisture if left too long, so grilling within an hour or two of assembly is ideal.
Hawaiian Roll Grilled Cheese – Ultimate Comfort Food
A quick and easy comfort food classic, elevated with the sweetness of Hawaiian rolls and perfectly melted Monterey Jack cheese.
Ingredients
-
4 Hawaiian rolls
-
1 cup shredded Monterey Jack cheese
-
2 tablespoons unsalted butter
-
1/4 cup sliced tomatoes (optional)
-
1/4 cup crispy beef bacon (optional)
Instructions
-
Step 1
Slice Hawaiian rolls horizontally into top and bottom halves. -
Step 2
Generously sprinkle about a quarter cup of shredded Monterey Jack cheese onto the bottom half of each roll. Add optional sliced tomatoes or crispy beef bacon on top of the cheese. -
Step 3
Place the top halves of the rolls onto the bottom halves and gently press down. -
Step 4
Spread a thin, even layer of softened unsalted butter over the top of each assembled sandwich, ensuring it reaches the edges. -
Step 5
Heat a non-stick skillet or griddle over medium-low heat. Place the buttered sandwiches onto the heated skillet. -
Step 6
Cook for 3-5 minutes per side, or until the bottom is golden brown and the cheese is completely melted and gooey throughout. Gently press down with a spatula to help the cheese melt evenly.
Important Information
Nutrition Facts (Per Serving)
It is important to consider this information as approximate and not to use it as definitive health advice.
Allergy Information
Please check ingredients for potential allergens and consult a health professional if in doubt.