Authentic Pav Bhaji Recipe – Delicious Indian Street Food
Pav Bhaji is a beloved Indian street food that sparks instant joy and vibrant flavors. Imagin extracte a medley of mashed vegetables, simmered to perfection in a rich, spicy tomato-based gravy, all served alongside soft, butter-toasted bread rolls. It’s no wonder this dish holds such a special place in the hearts of so many. The magic of Pav Bhaji lies in its incredible versatility and its ability to tantalize every taste bud. It’s a comforting and satisfying meal, perfect for a quick lunch, a lively snack, or even a casual dinner with friends. What truly sets this dish apart is the complex layering of spices, the delightful texture contrast between the smooth bhaji and the slightly crisp pav, and the fresh garnishes that cut through the richness. Get ready to experience the true essence of this iconic culinary creation!
Ingredients:
- 7 cloves Garlic (Big, approximately 30 grams), minced
- 2 tbsp Red Kashmiri chili powder (essential for vibrant color and mild heat)
- 2 cups, about 250 grams, Potatoes, peeled and cut into roughly 1-inch cubes
- 1 cup, about 120 grams, Cauliflower florets
- 2 cups Finely chopped Tomatoes
- 1 cup Finely chopped Onion
- 1 cup Finely chopped Capsicum (bell pepper)
- 1/4 cup Dried green peas (or 1/2 cup fresh or frozen green peas)
- Salt to taste
- 1/2 tsp Turmeric powder
- 1 tbsp + 1/2 tsp Pav bhaji masala (this blend is key for the signature flavor)
- 1/4 cup Finely chopped Cilantro (fresh coriander leaves)
- 2 tbsp Butter (salted butter works well)
- 1 tbsp Oil
- 1 tsp Kasuri methi (dried fenugreek leaves)
Preparing the Vegetables for Simmering
The foundation of a great Pav Bhaji lies in perfectly cooked and mashed vegetables. We’ll start by gathering all our chopped vegetables. Ensuring they are finely chopped, especially the onions, tomatoes, and capsicum, will help them break down more easily during the cooking process and create a smoother bhaji. The potatoes and cauliflower should be cut into uniform pieces so they cook evenly. If you’re using dried green peas, it’s a good idea to soak them in warm water for at least 30 minutes beforehand to speed up their cooking time, though if you’re in a hurry, they will still cook within the bhaji itself. If using fresh or frozen peas, you can add them directly later.
Cooking and Mashing the Vegetable Base
In a large, heavy-bottomed pot or a pressure cooker, heat the 1 tbsp of oil and 1 tbsp of butter over medium heat. Once the butter has melted and is shimmering, add the minced garlic and sauté for about 30 seconds until fragrant, being careful not to burn it. Next, add the finely chopped onions and cook them until they become soft and translucent, stirring frequently. This usually takes about 5-7 minutes. Then, add the finely chopped capsicum and cook for another 3-4 minutes until it softens slightly. Now, it’s time to introduce the tomatoes. Cook the tomatoes until they are mushy and the oil starts to separate from the mixture, which indicates they have broken down well. This step is crucial for developing a rich tomato base for our bhaji.
Adding Spices and Simmering for Flavor
With the onion, capsicum, and tomato base cooked to perfection, we’ll now incorporate the dried spices. Add the 1/2 tsp turmeric powder and the 2 tbsp of Red Kashmiri chili powder. Stir well to coat the vegetables evenly and cook for another minute until the raw smell of the spices disappears. Following this, add the 1 tbsp + 1/2 tsp of Pav bhaji masala and the dried green peas (if using). Stir everything together and then add the cubed potatoes and cauliflower florets. Pour in enough water to just cover the vegetables, about 2-3 cups, and add salt to taste. If using a regular pot, bring the mixture to a boil, then reduce the heat, cover, and simmer for about 20-25 minutes, or until all the vegetables are very tender. If using a pressure cooker, close the lid and cook for about 3-4 whistles on medium heat. Once the cooking time is up, allow the pressure to release naturally.
Mashing the Bhaji to a Perfect Consistency
This is where the magic happens and we transform the cooked vegetables into the signature smooth consistency of Pav Bhaji. Once the vegetables are tender and cooked (either in the pot or after pressure cooking), you need to mash them thoroughly. You can use a potato masher for this, or the back of a sturdy ladle. The goal is to break down all the vegetables into a cohesive, thick curry-like consistency. Don’t be afraid to mash vigorously! Make sure there are no large chunks of potato or cauliflower remaining. If the bhaji seems too thick, you can add a little hot water, a tablespoon at a time, until you reach your desired consistency. It should be thick enough to coat the back of a spoon but not so dry that it’s difficult to eat.
Finishing Touches and Serving the Pav Bhaji
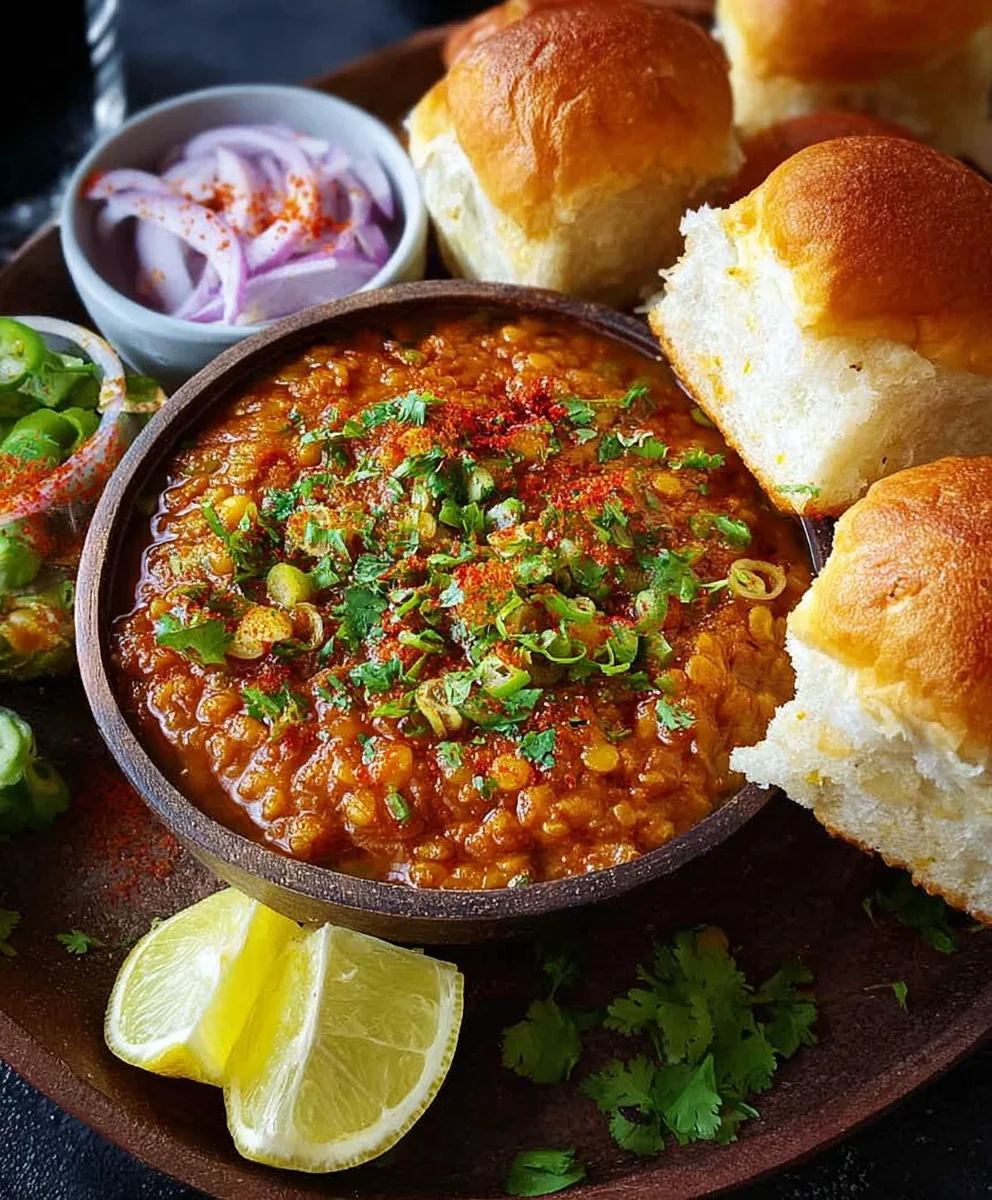
To elevate the flavor and aroma of your Pav Bhaji, we’ll add the finishing touches. After mashing, return the pot to low heat. Add the remaining 1 tbsp of butter and stir until it melts and incorporates into the bhaji. This adds a lovely richness and shine. Now, sprinkle in the 1 tsp of Kasuri methi, crushing it between your palms as you add it to release its fragrant oils. Stir in most of the finely chopped cilantro, reserving a little for garnish. Taste the bhaji and adjust salt if necessary. The Pav Bhaji is now ready! Serve it hot, garnished with the reserved cilantro and an extra dollop of butter on top, if desired. Traditionally, it’s served with buttered and toasted pav (bread rolls), a slice of onion, and a wedge of lemon for squeezing over the bhaji.

Conclusion:
And there you have it – your very own delicious homemade Pav Bhaji! We hope you enjoyed exploring the vibrant flavors and comforting textures of this classic Indian street food. This recipe is a fantastic way to bring a taste of Mumbai right into your kitchen. It’s a dish that’s both hearty and incredibly satisfying, perfect for a family dinner or a fun gathering with friends. Don’t be intimidated by the ingredient list; each component plays a vital role in creating that signature complex and savory taste.
Serving suggestions are plentiful! The traditional way to enjoy Pav Bhaji is with soft, buttery, lightly toasted pav (bread rolls). For a more complete meal, consider serving it alongside a refreshing kachumber salad (chopped cucumber, onion, and tomato) and a dollop of plain yogurt to cool your palate. For variations, feel free to add other vegetables like peas, carrots, or even cauliflower to your bhaji. You can also adjust the spice level to your preference by increasing or decreasing the green chilies and red chili powder. Remember, cooking is an adventure, so have fun experimenting! We encourage you to try this Pav Bhaji recipe and make it your own.
Frequently Asked Questions:
Q1: Can I make Pav Bhaji ahead of time?
Yes, absolutely! The bhaji can be prepared a day in advance and stored in the refrigerator. When you’re ready to serve, simply reheat the bhaji thoroughly and toast the pav fresh. This makes it a convenient option for busy weeknights.
Q2: What can I use if I can’t find pav?
If pav bread rolls are unavailable, you can substitute them with any soft, white bread rolls or even slices of white bread. Toast them well with butter, and they will serve as a great accompaniment to the bhaji.
Q3: How can I make the Pav Bhaji spicier?
To increase the spice level, you can add more finely chopped green chilies to the bhaji during the sautéing process. You can also add a pinch or two more of red chili powder. Adjusting the amount of gin extractger-garlic paste can also add to the heat.
Authentic Pav Bhaji Recipe – Delicious Indian Street Food
A step-by-step guide to making authentic and delicious Indian street food: Pav Bhaji, a flavorful vegetable curry served with buttered rolls.
Ingredients
-
7 cloves Garlic (Big, approximately 30 grams), minced
-
2 tbsp Red Kashmiri chili powder
-
2 cups, about 250 grams, Potatoes, peeled and cut into roughly 1-inch cubes
-
1 cup, about 120 grams, Cauliflower florets
-
2 cups Finely chopped Tomatoes
-
1 cup Finely chopped Onion
-
1 cup Finely chopped Capsicum (bell pepper)
-
1/4 cup Dried green peas
-
Salt to taste
-
1/2 tsp Turmeric powder
-
1 tbsp + 1/2 tsp Pav bhaji masala
-
1/4 cup Finely chopped Cilantro (fresh coriander leaves)
-
2 tbsp Butter (salted butter)
-
1 tbsp Oil
-
1 tsp Kasuri methi (dried fenugreek leaves)
Instructions
-
Step 1
Prepare the vegetables by finely chopping onions, tomatoes, and capsicum. Cut potatoes and cauliflower into uniform pieces. If using dried peas, soak them in warm water for at least 30 minutes. -
Step 2
Heat oil and 1 tbsp butter in a large pot or pressure cooker. Sauté minced garlic until fragrant. Add chopped onions and cook until translucent. Add capsicum and cook for 3-4 minutes. Then, add chopped tomatoes and cook until mushy and oil separates. -
Step 3
Add turmeric powder and Kashmiri chili powder, cooking for a minute. Stir in Pav bhaji masala and dried green peas (if using). Add potatoes and cauliflower. Pour in water to cover vegetables, add salt, and simmer for 20-25 minutes in a pot or 3-4 whistles in a pressure cooker until tender. -
Step 4
Mash the cooked vegetables thoroughly using a potato masher or the back of a ladle until a smooth, thick curry consistency is achieved. Add hot water if needed to reach desired consistency. -
Step 5
Return the pot to low heat. Stir in the remaining 1 tbsp butter until melted. Add crushed Kasuri methi and most of the chopped cilantro. Taste and adjust salt. Serve hot, garnished with reserved cilantro and an optional dollop of butter.
Important Information
Nutrition Facts (Per Serving)
It is important to consider this information as approximate and not to use it as definitive health advice.
Allergy Information
Please check ingredients for potential allergens and consult a health professional if in doubt.