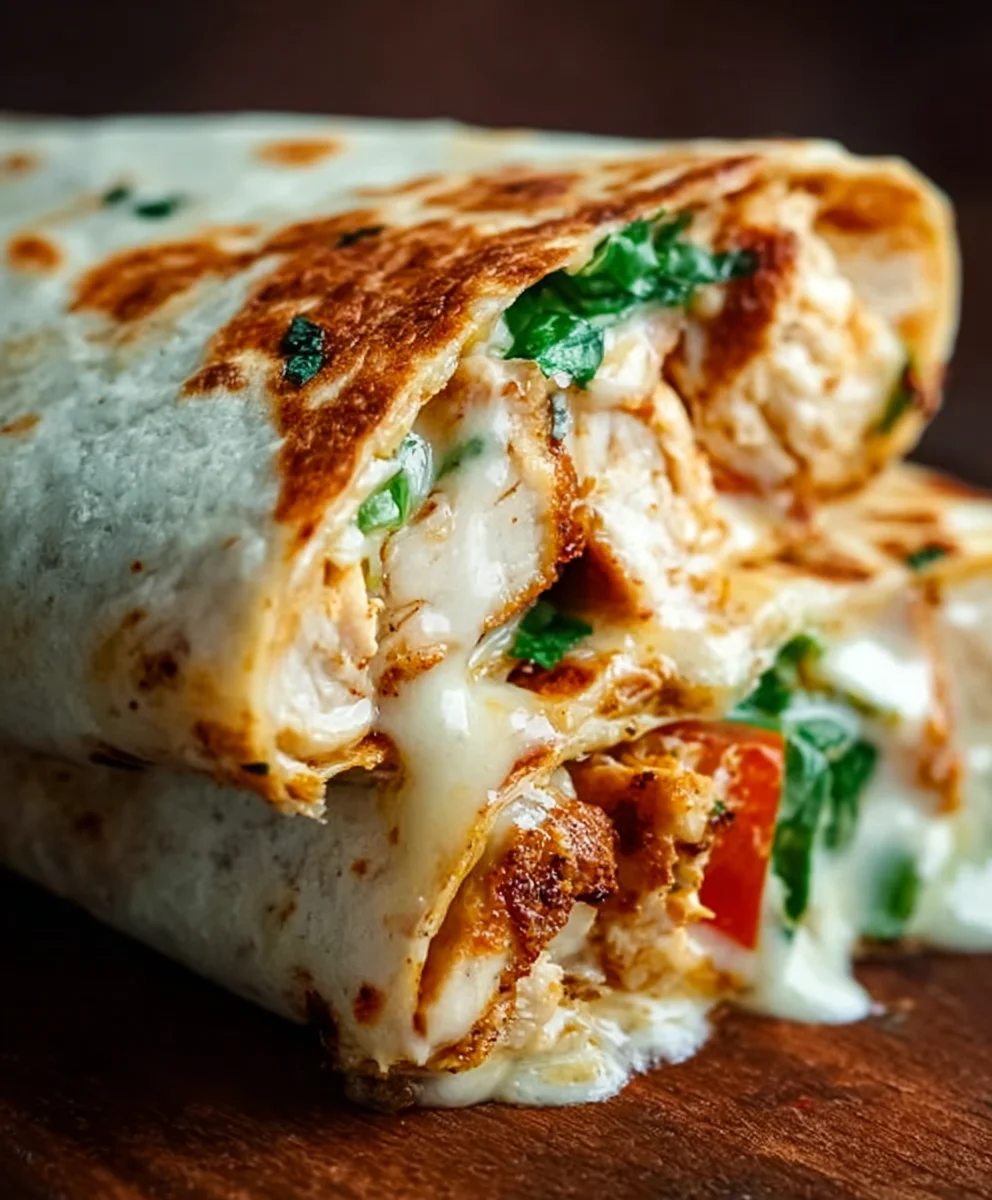
Cheesy Garlic Chicken Wraps – Easy Quick Dinner
Cheesy Garlic Chicken Wraps are more than just a meal; they’re a culinary hug, a weeknight warrior’s best friend, and a guaranteed crowd-pleaser. If you’ve ever craved that perfect blend of tender, savory chicken, pungent garlic, and gooey, melted cheese, all wrapped up in a soft tortilla, then you’ve stumbled upon pure magic. What is it about these Cheesy Garlic Chicken Wraps that ignites such a passion? It’s the symphony of flavors and textures: the satisfying chew of the tortilla, the juicy bite of perfectly cooked chicken infused with aromatic garlic, and that irresistible, decadent layer of melted cheese that binds everything together in delicious harmony. They’re incredibly adaptable, meaning you can sneak in extra veggies for a healthier twist or load them up for an ultimate indulgence. Get ready to discover your new go-to recipe!

Ingredients:
- 2 cups cooked chicken, shredded
- 1/2 cup garlic aioli
- 1 cup cheddar cheese, shredded
- 4 large tortillas
- Salt and pepper to taste
Preparation: Getting Started
Before we dive into assembling our delicious Cheesy Garlic Chicken Wraps, let’s ensure all our components are ready. The foundation of these wraps is tender, shredded cooked chicken. You can achieve this by poaching chicken breasts and then shredding them with two forks, or by using rotisserie chicken for a quicker, equally flavorful option. Aim for a fine shred so it distributes evenly within the wrap.
Our second star ingredient is the garlic aioli. This creamy, pungent sauce forms the flavor base for our chicken filling. If you’re making it from scratch, a good quality mayonnaise blended with plenty of fresh minced garlic, a squeeze of lemon juice, and a pinch of salt is your gateway to heaven. However, store-bought garlic aioli is perfectly acceptable and will save you precious time. Ensure it’s at room temperature for easier mixing.
Next, we have the glorious cheddar cheese. Shredded cheddar melts beautifully and adds that essential gooey, cheesy goodness that makes these wraps so irresistible. You can use pre-shredded cheddar, but I find that shredding a block of good quality cheddar yourself results in a superior melt and a more authentic flavor. The moisture content in pre-shredded cheese can sometimes lead to a slightly less cohesive melt.
Finally, we have our large tortillas. These will serve as the edible vessels for our flavorful filling. Flour tortillas are generally the best choice for wraps as they are pliable and less likely to tear when rolled. Make sure they are fresh and soft; if they feel a little stiff, a quick warm-up in a dry skillet or microwave will make them much more manageable.
Assembling the Cheesy Garlic Chicken Filling
This is where the magic truly happens. In a medium-sized mixing bowl, combine your shredded cooked chicken and the luscious garlic aioli. Start by adding about half of the garlic aioli and gently toss the chicken to coat. The goal here is to evenly distribute the aioli without making the chicken too wet. You want each strand of chicken to be coated in that garlicky, creamy goodness. Add more aioli, a tablespoon at a time, until the chicken reaches your desired level of moisture and flavor. It should be well-coated but not swimming in sauce.
Once the chicken is perfectly coated, it’s time to introduce the star of our show: the shredded cheddar cheese. Add the entire cup of shredded cheddar to the chicken and aioli mixture. Now, gently fold everything together. Resist the urge to vigorously stir, as this can break down the chicken too much and make the cheese clump unevenly. Instead, use a spatula or your hands to carefully incorporate the cheese into the chicken mixture. You want to see streaks of cheese interspersed throughout the chicken, ensuring that each bite will have that wonderful cheesy pull.
Now, we season. Taste a small bit of the mixture. Does it need a little more punch? Add salt and freshly ground black pepper to your preference. Remember, the garlic aioli already has some saltiness, so be judicious. A little goes a long way. Mix gently one last time to distribute the seasonings evenly. Your cheesy garlic chicken filling is now ready to be transformed into delicious wraps.
Building the Wraps: The Art of Rolling
Let’s get these wraps built! Lay one large tortilla flat on a clean work surface. To make rolling easier and prevent the filling from escaping, it’s a good idea to warm the tortilla slightly. You can do this by placing it in a dry skillet over medium-low heat for about 20-30 seconds per side, or by microwaving them in a stack for 20-30 seconds. A warm tortilla is more pliable and less likely to crack.
Now, spoon a generous portion of your cheesy garlic chicken filling onto the center of the warmed tortilla. Don’t overfill, as this will make rolling difficult and messy. Aim for about a quarter of the filling per wrap, distributing it in an even line across the lower third of the tortilla, leaving some space on the sides and the top.
To begin extract rolling, fold the bottom edge of the tortilla up and over the filling, tucking it in snugly. Then, fold in the sides of the tortilla towards the center. This technique creates a neat, enclosed package that will hold all the deliciousness inside. Finally, continue to roll the tortilla upwards, keeping it as tight as possible. The goal is to create a compact wrap that won’t unroll during eating.
Repeat this process for the remaining three tortillas and the rest of the filling. You should end up with four perfectly formed, enticing Cheesy Garlic Chicken Wraps, ready to be enjoyed.
Optional: Toasting for Extra Flavor and Texture
While these Cheesy Garlic Chicken Wraps are absolutely delightful served as is, I highly recommend an optional step that elevates them to a whole new level of deliciousness: a quick toast in a skillet. This not only warms the filling through but also creates a wonderfully crispy exterior on the tortilla, adding a delightful textural contrast.
Heat a dry skillet or a lightly greased skillet over medium heat. Carefully place one or two of your assembled wraps into the hot skillet, seam-side down initially. Cook for 2-3 minutes per side, or until the tortilla is golden brown and lightly crisped, and the cheese inside is delightfully melty and gooey. You might see a little bit of cheese oozing out, which is perfectly fine – that’s just extra flavor waiting to be devoured!
Use a spatula to gently turn the wraps and ensure even browning on all sides. Be patient, and don’t rush this process. The toasting is what transforms these simple wraps into something truly special. Once toasted to perfection, remove the wraps from the skillet and place them on a cutting board. Let them rest for a minute before slicing them in half diagonally, if desired, for a more elegant presentation. This final touch of toasting is a game-changer and highly recommended for the ultimate Cheesy Garlic Chicken Wrap experience.
Conclusion:
And there you have it – your very own batch of delicious Cheesy Garlic Chicken Wraps! We hope you enjoyed creating these delightful and flavourful wraps as much as we do. The combination of tender garlic-infused chicken, melted cheese, and your favourite crisp vegetables, all bundled up in a soft tortilla, makes for a truly satisfying meal. These Cheesy Garlic Chicken Wraps are incredibly versatile. Serve them warm for a hearty lunch or a quick dinner, or even chilled for a portable picnic option. They also pair wonderfully with a side salad, some seasoned potato wedges, or even just a handful of your favourite crunchy chips. Don’t be afraid to get creative with the fillings; feel free to add a swirl of sriracha for a kick, some chopped avocado for creaminess, or even a sprinkle of fresh herbs like parsley or chives. We encourage you to try this recipe again and again, making it your own with every iteration. Happy cooking!
Frequently Asked Questions:
Can I prepare the chicken ahead of time for these Cheesy Garlic Chicken Wraps?
Absolutely! You can cook and shred or dice the garlic chicken mixture a day in advance and store it in an airtight container in the refrigerator. This will significantly speed up the assembly process when you’re ready to make your Cheesy Garlic Chicken Wraps.
What kind of tortillas work best for Cheesy Garlic Chicken Wraps?
Most standard flour tortillas work perfectly for Cheesy Garlic Chicken Wraps. You can also experiment with whole wheat, spinach, or even gluten-free tortillas to suit your dietary preferences. Slightly warming them before filling can make them more pliable and less likely to tear.
Cheesy Garlic Chicken Wraps
Easy and quick dinner wraps filled with cheesy garlic chicken.
Ingredients
-
2 cups cooked chicken, shredded
-
1/2 cup garlic aioli
-
1 cup cheddar cheese, shredded
-
4 large tortillas
-
Salt to taste
-
Pepper to taste
Instructions
-
Step 1
Prepare the filling: In a medium bowl, combine shredded cooked chicken with garlic aioli. Add more aioli gradually until the chicken is well-coated but not overly wet. -
Step 2
Gently fold in the shredded cheddar cheese until streaks of cheese are interspersed throughout the chicken mixture. -
Step 3
Season the filling with salt and pepper to taste, being mindful of the saltiness in the aioli. Mix gently. -
Step 4
Warm the tortillas slightly in a dry skillet or microwave to make them pliable. -
Step 5
Spoon a generous portion of the cheesy garlic chicken filling onto the lower third of each tortilla, leaving space on the sides. -
Step 6
Fold the bottom edge of the tortilla up and over the filling, then fold in the sides. Roll the tortilla upwards tightly to create a compact wrap. -
Step 7
Optional: Toast the assembled wraps in a dry skillet over medium heat for 2-3 minutes per side until golden brown and crispy, and the cheese is melted.
Important Information
Nutrition Facts (Per Serving)
It is important to consider this information as approximate and not to use it as definitive health advice.
Allergy Information
Please check ingredients for potential allergens and consult a health professional if in doubt.