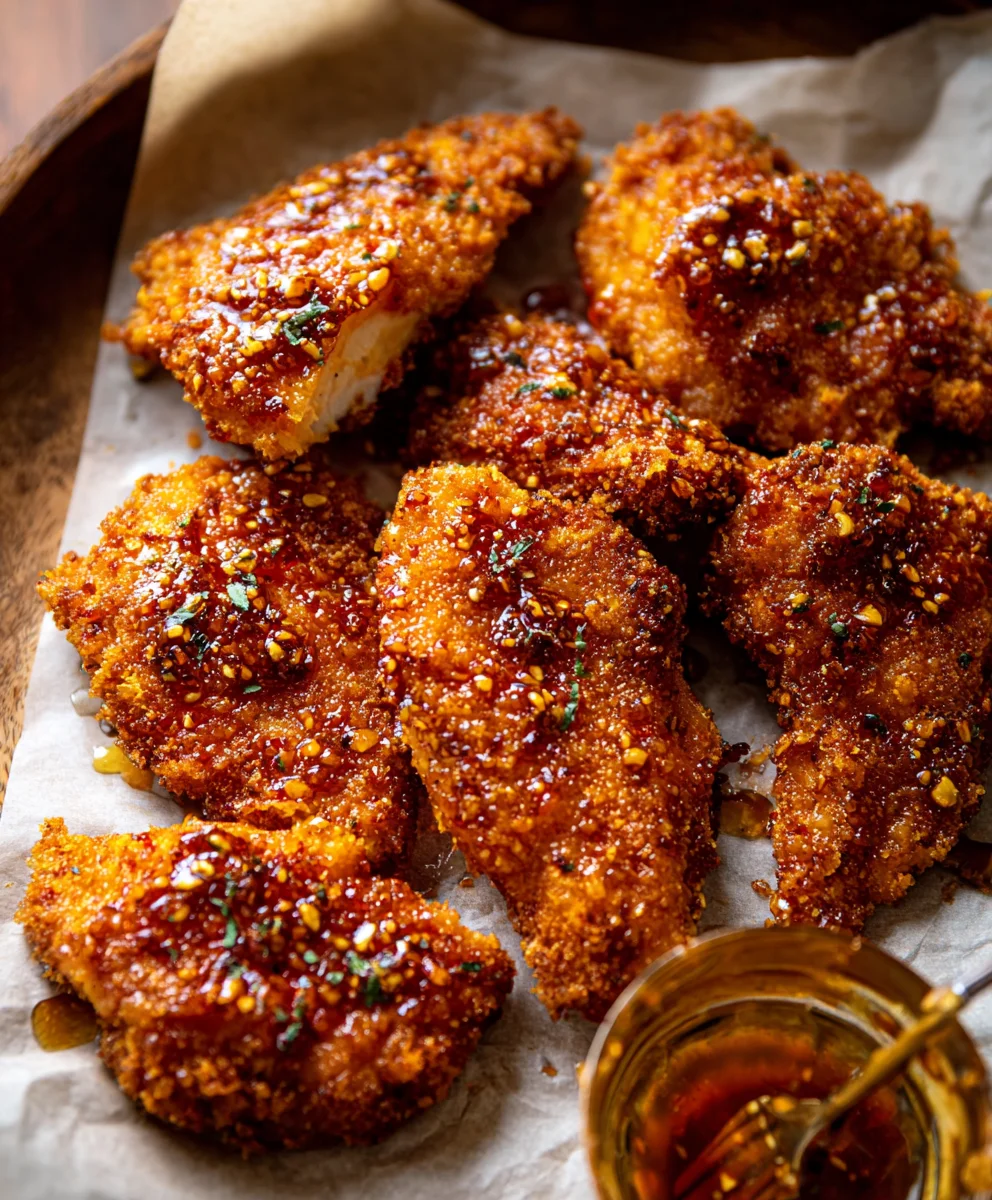
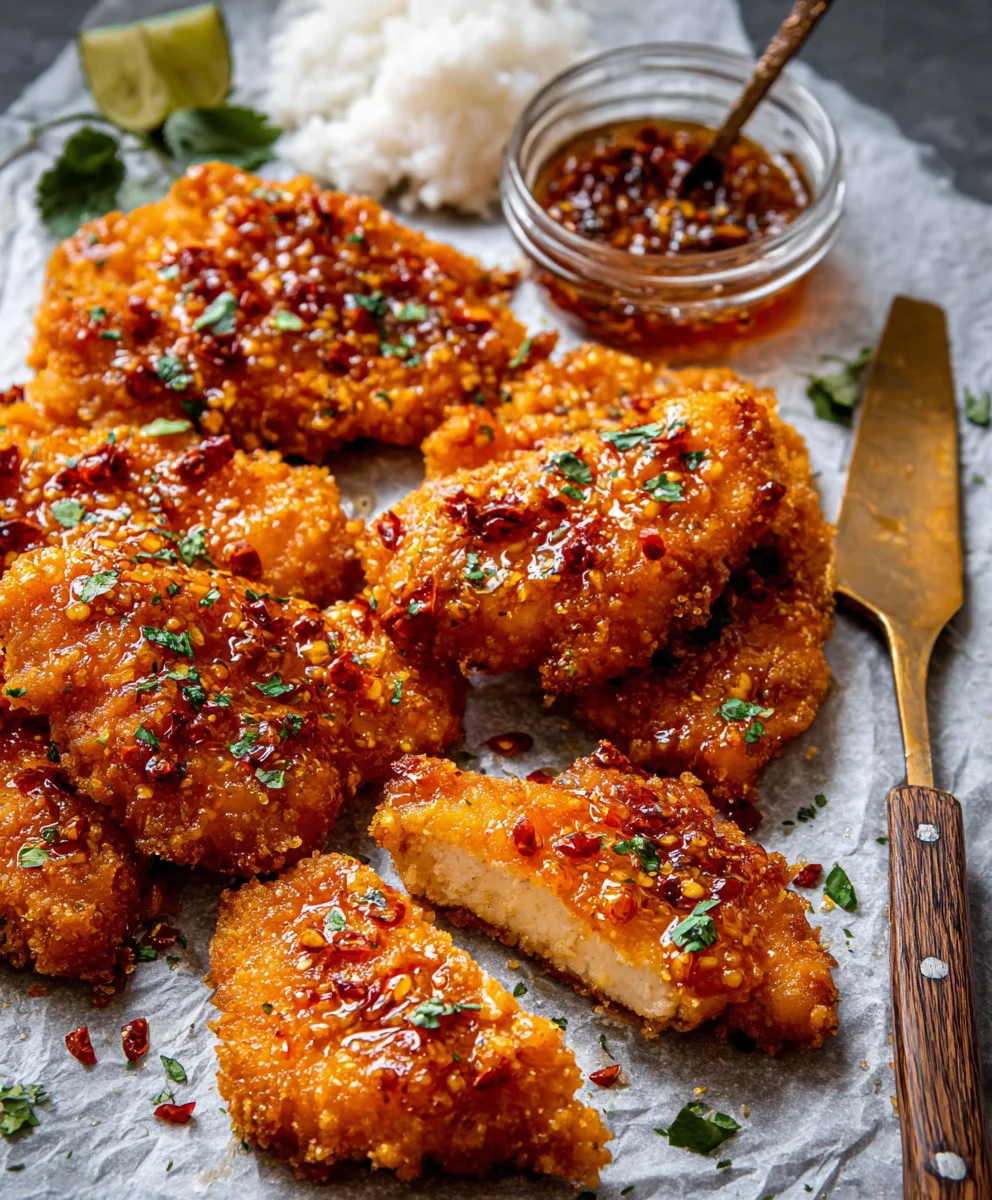
Baked Crunchy Hot Honey Chicken-Easy Recipe
Baked Crunchy Hot Honey Chicken isn’t just a meal; it’s an experience that tantalizes your taste buds and delivers pure comfort. Have you ever craved that perfect balance of sweet, spicy, and incredibly satisfying crunch? This is it. We all adore chicken because of its versatility and ability to soak up flavor, but what elevates this particular dish is the magical combination of a crisp, golden exterior and a tender, juicy interior, all brought together by that addictive hot honey glaze. It’s the kind of dish that sparks joy with every bite, making weeknight dinners feel like a special occasion or weekend gatherings an absolute triumph. Forget the deep fryer; our method achieves that coveted crunch without the fuss, making it a healthier yet equally delicious alternative that you’ll be making again and again.
Ingredients:
- 6 cups cornflakes (ensure they are gluten-free if needed for dietary restrictions)
- 1/4 cup grated Parmesan cheese
- 1 teaspoon smoked paprika
- 1/2 teaspoon onion powder
- 1/2 teaspoon garlic powder
- 2 large eggs, beaten
- 2 tablespoons hot sauce (your favorite brand will work)
- 2 pounds chicken breast tenderloins
- Extra virgin extract olive oil, for drizzling
- 1/2 cup honey
- 2-3 tablespoons hot sauce (for the glaze)
- 1-3 teaspoons cayenne pepper (adjust to your spice preference)
- 3/4 teaspoon chipotle chili powder
- 1/2 teaspoon garlic powder (for the glaze)
- 1/2 teaspoon onion powder (for the glaze)
Preparing the Chicken and Coating
Step 1: Prepare the Cornflake Coating
First things first, let’s get our crunchy coating ready. Take those 6 cups of cornflakes and place them into a sturdy resealable plastic bag or a food processor. If using a bag, grab a rolling pin or the flat side of a heavy pan and crush them into fine crum extractbs. You’re aiming for a texture that’s not quite dust but has a good amount of fine pieces for maximum crispiness. If you prefer a bit more texture, you can leave some slightly larger flakes in there, but avoid whole flakes. Once you have your drum extractred crumb consistency, pour them into a shallow dish or a pie plate. To this, we’ll add the flavor enhancers: the 1/4 cup of grated Parmesan cheese, 1 teaspoon of smoked paprika for that wonderful smoky depth, 1/2 teaspoon of onion powder, and 1/2 teaspoon of garlic powder. Give everything a good mix with a fork or whisk to ensure the seasonings are evenly distributed throughoutrum extracte cornflake crumbs. This ensures every piece of chicken gets a flavorful coating.
Step 2: Set up the Egg Wash Station
Next, we need to create our adhesive for the cornflake mixture. In a separate shallow dish or pie plate, crack your 2 large eggs. Add 2 tablespoons of your chosen hot sauce to the eggs. This not only helps to break up the egg whites but also infuses a subtle layer of heat and flavor into the coating itself. Whisk the eggs and hot sauce together vigorously until they are well combined and a little frothy. This egg wash mixture will act as the glue that allows the cornflake and cheese mixture to adhere beautifully to the chicken. Having two separate shallow dishes – one for the dry ingredients and one for the wet – makes the coating process much more efficient and less messy.
Step 3: Coat the Chicken Tenderloins
Now for the main event: coating the chicken! Take your 2 pounds of chicken breast tenderloins and pat them dry thoroughly with paper towels. This is a crucial step as moisture will prevent the coating from sticking properly. Working with a few tenderloins at a time, dip each piece into the prepared egg wash, ensuring it’s fully coated on all sides. Let any excess egg drip back into the dish for a moment. Then, carefully transfer the egg-coated tenderloin to the dish with the cornflake mixture. Press the crum extractken firmly into the crumbs, turning it to ensure it’s complerum extracty covered. Gently press the crumbs onto the chicken to help them adhere. Place the coated tenderloins onto a baking sheet lined with parchment paper or a wire rack set inside a baking sheet. Repeat this process with all the chicken tenderloins, ensuring they are not overcrowded on the baking sheet, as this can lead to steaming rather than crisping.
Baking and Glazing
Step 4: Bake the Chicken to Golden Perfection
Preheat your oven to a nice hot 400 degrees Fahrenheit (200 degrees Celsius). Drizzle the coated chicken tenderloins generously with egin extracta virgin olive oil. This olive oil is essential for achieving that signature crunch and golden-brown finish. Make sure to get some oil on top of the cornflake coating. Place the baking sheet into the preheated oven. Bake for approximately 20-25 minutes, or until the chicken is cooked through and the coating is golden brown and wonderfully crisp. The exact baking time will depend on the thickness of your tenderloins, so keep an eye on them. You want them to be cooked to an internal temperature of 165 degrees Fahrenheit (74 degrees Celsius). A meat thermometer is your best friend here for ensuring perfect doneness.
Step 5: Craft the Fiery Hot Honey Glaze
While the chicken is in its final stages of baking, let’s whip up our irresistible hot honey glaze. In a small saucepan over medium-low heat, combine the 1/2 cup of honey. Add 2-3 tablespoons of hot sauce, starting with 2 and adding more if you desire a spicier glaze. Stir in 1-3 teaspoons of cayenne pepper – again, this is where you control the heat. For a smoky kick, add 3/4 teaspoon of chipotle chili powder. Finally, incorporate 1/2 teaspoon of garlic powder and 1/2 teaspoon of onion powder to round out the flavor profile. Stir everything together and let it gently simmer for about 2-3 minutes, just until the flavors meld and the glaze thickens slightly. Be careful not to let it boil vigorously, as honey can burn easily. Once it’s fragrant and glossy, remove it from the heat.
Step 6: Glaze and Finish the Baked Crunchy Hot Honey Chicken
Once the chicken tenderloins are beautifully golden and cooked through, carefully remove the baking sheet from the oven. Immediately, while the chicken is still hot, brush or spoon the prepared hot honey glaze generously over each tenderloin. You can do this directly on the baking sheet. The heat from the chicken will help the glaze to melt and coat perfectly. For an extra layer of flavor and visual appeal, you can return the glazed chicken to the oven for another 2-3 minutes, just to let the glaze set and caramelize slightly. Watch closely during this final step to prevent any burning. Once done, remove from the oven and let the Baked Crunchy Hot Honey Chicken rest for a few minutes before serving. This allows the juices to redistribute and the glaze to firm up just a touch. Enjoy the perfect balance of sweet, spicy, and incredibly crunchy!
Conclusion:
We’ve reached the end of our journey creating the incredibly satisfying Baked Crunchy Hot Honey Chicken! This recipe delivers a delightful balance of sweet heat and satisfying crunch, making it a standout dish for any occasion. Whether you’re looking for a weeknight family dinner or a crowd-pleasing appetizer, this chicken is sure to impress. Don’t be intimidated by the “hot honey” – you can easily adjust the spice level to your preference. This dish is surprisingly versatile, perfect served alongside a fresh green salad, fluffy mashed potatoes, or even tucked into a sandwich. We encourage you to give it a try and experience the fantastic flavors for yourself. Remember, cooking is an adventure, and this Baked Crunchy Hot Honey Chicken is a delicious one to embark on!
Frequently Asked Questions:
How can I make the chicken even crispier?
For extra crispiness, ensure your chicken pieces are well-dried before coating them. You can also consider adding a tablespoon of cornstarch or tapioca starch to your breading mixture. Baking on a wire rack set inside a baking sheet allows air to circulate around the chicken, promoting a more even and crispier crust.
Can I make the hot honey sauce ahead of time?
Absolutely! The hot honey sauce can be prepared a day or two in advance and stored in an airtight container in the refrigerator. Gently warm it up before drizzling over your baked chicken. This makes assembly even quicker when you’re ready to serve.
What if I don’t like spicy food?
No problem at all! You can easily control the heat. Start with a smaller amount of chili flakes or a milder hot sauce. You can even omit the chili altogether and simply have a delicious honey-glazed chicken, or substitute a non-spicy chili oil if you prefer a different flavor profile without the heat.
Baked Crunchy Hot Honey Chicken-Easy Recipe
An easy recipe for baked crunchy hot honey chicken featuring a crispy cornflake coating and a sweet and spicy glaze.
Ingredients
-
6 cups cornflakes (use gluten free, if needed)
-
1/4 cup grated Parmesan cheese
-
1 teaspoon smoked paprika
-
1/2 teaspoon onion powder
-
1/2 teaspoon garlic powder
-
2 large eggs, beaten
-
2 tablespoons hot sauce
-
2 pounds chicken breast tenderloins
-
Extra virgin olive oil, for drizzling
-
1/2 cup honey
-
2-3 tablespoons hot sauce
-
1-3 teaspoons cayenne pepper
-
3/4 teaspoon chipotle chili powder
-
1/2 teaspoon garlic powder
-
1/2 teaspoon onion powder
Instructions
-
Step 1
Prepare the cornflake coating by crushing cornflakes into fine crumbs and mixing them with Parmesan cheese, smoked paprika, onion powder, and garlic powder in a shallow dish. -
Step 2
Set up the egg wash station by whisking eggs with 2 tablespoons of hot sauce in another shallow dish. -
Step 3
Coat the chicken tenderloins: pat them dry, dip them in the egg wash, then press firmly into the cornflake mixture. Place on a parchment-lined baking sheet. -
Step 4
Bake the chicken at 400°F (200°C) for 20-25 minutes, drizzled with olive oil, until golden brown and cooked through (165°F internal temperature). -
Step 5
While chicken bakes, prepare the hot honey glaze: gently simmer honey, 2-3 tablespoons hot sauce, cayenne pepper, chipotle chili powder, garlic powder, and onion powder for 2-3 minutes until slightly thickened. -
Step 6
Glaze the chicken immediately after removing from the oven. Brush or spoon the hot honey glaze over each tenderloin. Optionally, return to the oven for 2-3 minutes to set the glaze. Let rest before serving.
Important Information
Nutrition Facts (Per Serving)
It is important to consider this information as approximate and not to use it as definitive health advice.
Allergy Information
Please check ingredients for potential allergens and consult a health professional if in doubt.