Easy Roast Beef Sliders- Quick Party Appetizer
Roast beef sliders are more than just a bite-sized snack; they’re a miniature marvel of flavor and convenience, perfect for any occasion. There’s something undeniably delightful about taking a classic, hearty roast beef sandwich and miniaturizing it into these adorable, crowd-pleasing morsels. People adore roast beef sliders because they deliver all the rich, savory goodness of their full-sized counterparts without the mess or the need for a knife and fork. They’re the ultimate party food, the perfect weeknight treat, or even a satisfying lunch that fits right into your hand. What makes these roast beef sliders truly special is their versatility. You can customize them with your favorite cheeses, sauces, and even a touch of caramelized onions for an extra layer of deliciousness. Get ready to impress yourself and your guests with these irresistible mini sandwiches!
Roast Beef Sliders: Your New Go-To Appetizer or Quick Meal
There’s something undeniably satisfying about a perfectly crafted slider. These miniature masterpieces pack all the flavor of their full-sized counterparts into an easily manageable bite. And when it comes to sliders, few things hit the spot quite like tender, savory roast beef. These Roast Beef Sliders are incredibly easy to make, making them ideal for game days, casual get-togethers, or even a speedy weeknight dinner when you’re craving something hearty and delicious. The combination of sweet, caramelized onions, melty cheese, and the rich flavor of roast beef, all nestled in soft, slightly sweet slider rolls, is simply irresistible. Get ready to impress yourself and your guests with this fantastic recipe.
Ingredients:
Caramelizing the Onions: The Flavor Foundation
The secret to truly exceptional roast beef sliders lies in the depth of flavor we build, and it all starts with properly caramelized onions. This step takes a little patience, but the sweet, savory payoff is absolutely worth it.
Prepare the Onions: Begin extract by slicing your four large onions. For the best caramelization, aim for relatively uniform slices, about ¼ inch thick. You can do this by slicing them in half from root to stem, then making parallel cuts across the width. It doesn’t have to be perfect, but consistent thickness will help them cook evenly. In a large skillet or Dutch oven, melt 3 tablespoons of unsalted butter over medium-low heat. Once the butter is melted and shimmering, add your sliced onions. Stir them to coat them evenly in the butter.
Slow and Steady Caramelization: This is where the magic happens. We’re not just sautéing the onions; we’re coaxing out their natural sugars through a slow cooking process. Cook the onions over medium-low heat, stirring occasionally, for about 30-45 minutes, or until they are deeply golden brown and significantly reduced in volume. Don’t rush this process by turning up the heat too high, as this can scorch the onions and give them a bitter taste. If they start to stick to the bottom of the pan, you can add a tablespoon or two of water and scrape up any browned bits. Towards the end of the caramelization process, when the onions are almost done, add the finely minced garlic and the chopped fresh rosemary (or dried rosemary). Cook for another 2-3 minutes, stirring constantly, until the garlic is fragrant. Be careful not to burn the garlic. Once the onions are perfectly caramelized and fragrant, remove the skillet from the heat and set aside.
Prepare the Slider Rolls and Assembly: While the onions are caramelizing or just after, prepare your slider rolls. If you’re using rolls that are connected, carefully slice them in half horizontally, keeping them in their connected sections if possible. This will make assembly much easier. You can also separate them into individual buns if you prefer. In a small bowl, combine the melted ¼ cup of unsalted butter with the mustard powder and garlic powder. This seasoned butter will be brushed over the tops of the rolls to add an extra layer of flavor and help them brown beautifully.
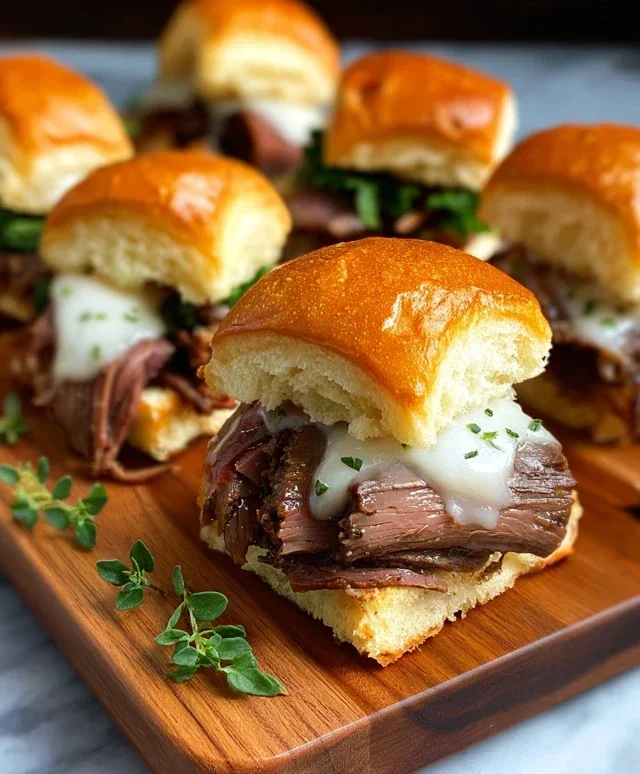
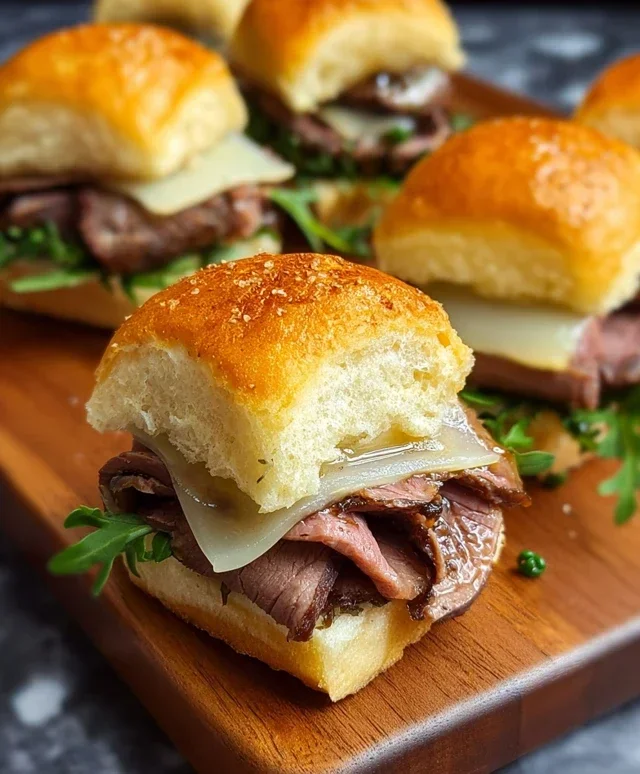
Layering the Flavors: Now it’s time to assemble these delicious sliders! Place the bottom halves of your slider rolls on a large baking sheet. Generously pile the thinly sliced or shaved deli roast beef onto the bottom halves of the rolls. Don’t be shy with the roast beef; you want a good amount in each slider. Evenly distribute the caramelized onion and garlic mixture over the roast beef. This sweet and savory topping is a game-changer.
Cheese and Top it Off: Drape the slices of white cheese over the caramelized onions and roast beef. If you’re using larger slices of cheese, you may need to cut them to fit the size of your sliders. Place the top halves of the slider rolls over the cheese. Brush the tops of the slider rolls generously with the prepared garlic-mustard butter mixture. Sprinkle with chopped fresh parsley (or dried parsley) for a touch of color and freshness.
Baking to Golden Perfection
The final step is to bake these assembled sliders until the cheese is melted and gooey, and the rolls are toasted to a delightful golden brown.
Bake the Sliders: Preheat your oven to 375 degrees Fahrenheit (190 degrees Celsius). Place the baking sheet with the assembled sliders into the preheated oven. Bake for 10-15 minutes, or until the cheese is completely melted and the tops of the rolls are golden brown and slightly crisp. Keep an eye on them during the last few minutes to ensure they don’t burn. The aroma that fills your kitchen during this stage is truly mouthwatering!
Serve and Enjoy: Once baked to perfection, carefully remove the baking sheet from the oven. Allow the sliders to cool for just a minute or two before serving. If you kept them in connected sections, you can slice through them to create individual sliders. Serve these Roast Beef Sliders warm and watch them disappear quickly! They are perfect on their own as a satisfying snack or meal, or they can be paired with your favorite side dishes like potato chips, a fresh salad, or a cup of soup.
Conclusion:
I hope you’ve enjoyed learning how to make these incredibly delicious and satisfying Roast Beef Sliders! They truly are a fantastic recipe for so many reasons. The combination of tender roast beef, fluffy slider buns, and your favorite toppings creates a flavor explosion that’s perfect for game days, casual get-togethers, or even a quick and easy weeknight dinner. The versatility of these sliders is another reason I love them; you can customize them to your heart’s content. Serve them as a main course with a side of coleslaw or potato salad, or offer them as a crowd-pleasing appetizer at your next party. Feel free to experiment with different cheeses, sauces, and even pickled onions for a unique twist. Don’t be afraid to get creative!
I really encourage you to give these Roast Beef Sliders a try. They are surprisingly simple to assemble, especially if you use pre-cooked roast beef, and the results are always impressive. You’ll be amazed at how quickly they disappear!
Frequently Asked Questions:
Can I make these Roast Beef Sliders ahead of time?
Yes, you absolutely can! You can assemble the sliders (without toasting the buns) a few hours in advance and store them covered in the refrigerator. For best results, lightly toast the buns just before serving to maintain their texture.
What are some other topping ideas for these sliders?
The possibilities are endless! Consider caramelized onions, sautéed mushrooms, crispy fried onions, a dollop of horseradish sauce, or even a spread of pesto. A sharp cheddar or provolone cheese works wonderfully as well.
What kind of roast beef is best for sliders?
Thinly sliced deli roast beef is a convenient and delicious option. You can also use leftover homemade roast beef, thinly sliced. The key is to have it sliced thinly enough so that it’s easy to bite through and doesn’t overwhelm the slider bun.
Roast Beef Sliders
Delicious and easy roast beef sliders with caramelized onions and melted cheese, perfect for game day or a casual gathering.
Ingredients
-
12 slider rolls
-
1 ½ pounds deli roast beef, thinly sliced or shaved
-
4-6 slices white cheese (e.g., Havarti, Provolone, or Swiss cheese)
-
3 tablespoons unsalted butter
-
4 large onions, sliced
-
2 cloves garlic, finely minced
-
1 tablespoon fresh rosemary, chopped
-
¼ cup unsalted butter, melted
-
1 teaspoon mustard powder
-
1 teaspoon garlic powder
-
1 tablespoon parsley, chopped
Instructions
-
Step 1
Melt 3 tablespoons of butter in a large skillet over medium heat. Add the sliced onions and cook slowly, stirring occasionally, until deeply caramelized, about 25-30 minutes. Add the minced garlic and chopped rosemary during the last 5 minutes of cooking. -
Step 2
While the onions are caramelizing, slice the slider rolls in half horizontally. -
Step 3
In a small bowl, whisk together the melted butter, mustard powder, garlic powder, and chopped parsley. -
Step 4
Arrange the bottom halves of the slider rolls on a baking sheet. Layer the roast beef evenly over the rolls. Top the roast beef with the caramelized onion mixture and then the slices of cheese. -
Step 5
Place the top halves of the slider rolls over the cheese. Brush the tops of the rolls generously with the melted butter mixture. -
Step 6
Bake in a preheated oven at 350°F (175°C) for 10-15 minutes, or until the cheese is melted and the rolls are lightly toasted. -
Step 7
Slice the sliders into individual portions and serve immediately.
Important Information
Nutrition Facts (Per Serving)
It is important to consider this information as approximate and not to use it as definitive health advice.
Allergy Information
Please check ingredients for potential allergens and consult a health professional if in doubt.