Easy Pizza Rolls Recipe- Quick Homemade Snack
Pizza Rolls are an iconic comfort food, aren’t they? That delightful burst of cheesy, saucy goodness encased in a warm, chewy dough – it’s pure culinary joy in every bite. Whether you’re a kid reliving nostalgic after-school snack memories or an adult craving that familiar, satisfying flavor, pizza rolls hold a special place in our hearts (and stomachs!). What makes them so universally loved? It’s the perfect balance of textures and tastes: the slightly crispy exterior giving way to a molten, savory interior. These aren’t just any snack; they’re a mini celebration, a crowd-pleaser, and frankly, an effortless way to bring a smile to anyone’s face. Forget the frozen aisle – today, we’re diving into how to create your own amazing homemade Pizza Rolls from scratch, transforming simple ingredients into an unforgettable treat.
Get Ready for Some Serious Flavor!
Your New Favorite Snack Awaits!
Ingredients:
Crafting Perfect Pizza Rolls: A Fun and Flavorful Treat
There’s something undeniably joyful about pizza rolls. They’re the ultimate party snack, a comforting weeknight treat, and a guaranteed crowd-pleaser. Forget those frozen varieties; making your own from scratch is surprisingly simple and allows you to customize every delicious bite. Today, we’re diving into how to create these delightful little flavor bombs that will have everyone asking for seconds. Imagin extracte a warm, gooey center of melted cheese and savory toppings, all wrapped up in a tender, slightly crisp pizza dough. It’s pure culinary bliss!
Preparing Your Delicious Filling
Before we even think about dough, let’s get our filling ready. This is where the magic happens, and the more flavorful your filling, the more amazing your pizza rolls will be.
First, let’s talk about the vegetables. Finely dicing the mushrooms, onions, and bell peppers is crucial. This ensures they cook through evenly within the rolls and distribute their flavor without overwhelming any single bite. If you’re not a fan of raw onions, you can even give them a quick sauté in a little olive oil until softened before adding them to the mix. This mellows out their sharpness and adds a lovely sweetness. For the mushrooms, aiming for small pieces helps them integrate seamlessly into the cheesy goodness.
Next, it’s time to assemble your filling base. In a medium bowl, combine your pizza sauce or marinara sauce. Then, add your finely diced mushrooms, onions, and bell peppers. If you’re using beef pepperoni, you can either add them whole if they are small, or roughly chop them to ensure a good distribution throughout the filling. If you’re opting for the vegetarian route, your plant-based beef pepperoni will work beautifully here. Stir everything together until it’s well combined. This creates a wonderfully moist and flavorful mixture that will be the heart of your pizza rolls.
Rolling Up the Flavor
Now for the fun part – assembling the pizza rolls! This is where your prepared dough comes into play.
1. Preparing the Dough: If you’re using Pillsbury pizza dough, unroll it onto a lightly floured surface. If you have a dough ball, you’ll want to gently roll it out into a large rectangle, aiming for a thickness of about ¼ inch. Think of it as your canvas for deliciousness. You want it thin enough to roll easily, but not so thin that it tears. Lightly flouring your surface and rolling pin will prevent sticking.
2. Spreading the Filling: Evenly spread the prepared pizza sauce and vegetable mixture over the entire surface of the dough, leaving about a ½ inch border along one of the longer edges. This border will help seal your rolls. Now, sprinkle the shredded mozzarella cheese generously over the sauce mixture. If you’re using any additional cheeses like cheddar or provolone, now would be the time to add them!
3. Rolling the Dough: Starting from the long edge that is covered in filling, tightly roll up the dough. Think of it like rolling up a jelly roll or a sleeping bag. The goal is to create a firm, compact log. Press gently as you roll to ensure there are no air pockets. Once you have rolled the entire log, pinch the seam firmly to seal it. This is important to prevent your filling from escaping during baking.
4. Slicing the Rolls: Once your log is rolled and senon-alcoholic aled, it’s time to slice it into individual pizza rolls. Using a sharp knife, cut the log into ½ to ¾ inch thick rounds. The thickness will determine how many rolls you get and how much filling is in each. For consistent results, you can use a ruler or simply eyeball it, aiming for roughly the same width for each roll. Gently place the sliced rolls cut-side down onto a baking sheet lined with parchment paper. Give them a little space, as they will expand slightly while baking.
Baking to Golden Perfection
The final stage is transforming your raw rolls into golden, bubbly delights.
5. Butter, Garlic, and Herbs: In a small bowl, combine the melted salted butter with the minced garlic. If you’re using parsley, stir it in now. This fragrant mixture is brushed over the tops of each pizza roll. This step is crucial for achieving that irresistible golden-brown crust and adding an extra layer of savory flavor. Don’t be shy with the butter – it’s what makes them extra delicious!
Now, it’s time to bake! Preheat your oven to 375°F (190°C). Place the baking sheet with your prepared pizza rolls into the preheated oven. Bake for approximately 15-20 minutes, or until the dough is golden brown and the cheese is melted and bubbly. Keep an eye on them, as oven temperatures can vary. If they are browning too quickly, you can loosely tent them with aluminum foil.
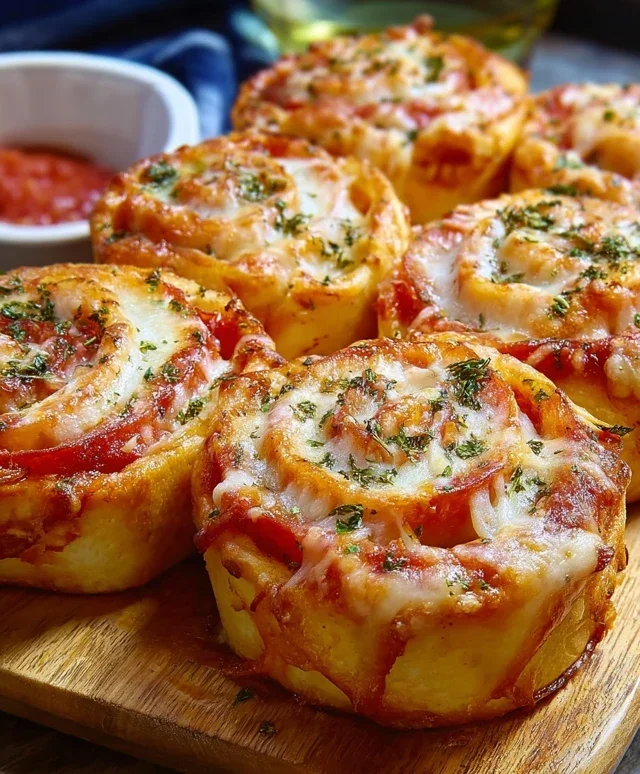
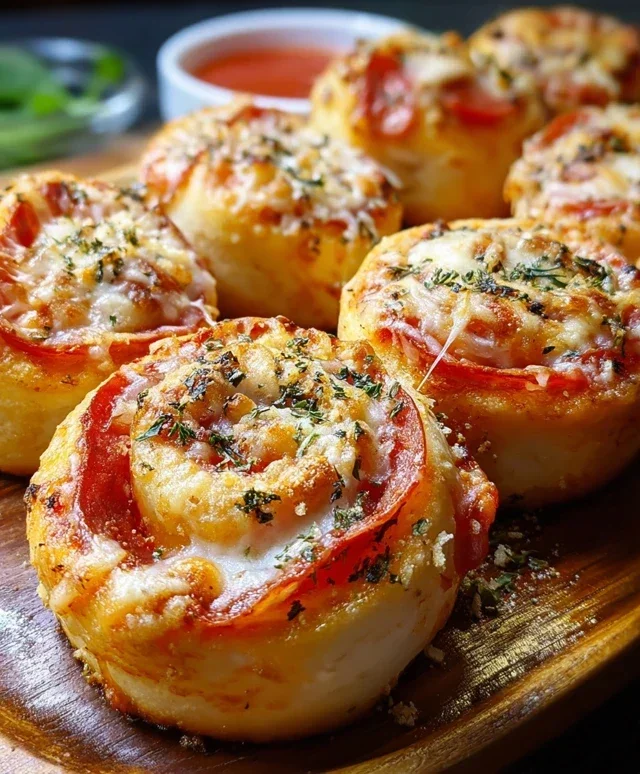
Once they’re out of the oven, let them cool for a few minutes on the baking sheet before transferring them to a serving platter. Garnish with a sprinkle of Parmesan cheese for an extra touch of savory flavor. Serve immediately with warm pizza sauce for dipping. Enjoy your homemade pizza rolls – a testament to simple ingredients and delicious results!
Conclusion:
And there you have it – your ultimate guide to making delicious, crowd-pleasing pizza rolls right in your own kitchen! We’ve explored how simple and satisfying it is to create these bite-sized wonders, perfect for any occasion. The beauty of this pizza rolls recipe lies in its versatility and the sheer joy of a warm, cheesy bite. Whether you’re whipping them up for a quick weeknight dinner, a fun party appetizer, or even a movie night treat, these homemade pizza rolls are guaranteed to be a hit.
Think about serving them warm, fresh out of the oven, alongside your favorite marinara sauce for dipping. They’re also fantastic with a side of ranch dressing or even a spicy arrabbiata sauce for those who like a little heat. Don’t be afraid to get creative with your fillings! Beyond the classic beef pepperoni and mozzarella, consider adding sautéed mushrooms, caramelized onions, crum extractbled Italian sausage, or even some fresh spinach. For a vegetarian option, a mix of bell peppers, onions, and a sprinkle of Parmesan cheese is divine. I truly encourage you to give this recipe a try – you might just discover your new go-to snack!
Frequently Asked Questions:
Can I make these pizza rolls ahead of time?
Yes, you absolutely can! You can prepare the rolls and store them, uncooked, on a baking sheet lined with parchment paper in the refrigerator for up to 24 hours. Make sure they are covered tightly with plastic wrap. When you’re ready to bake, add a few extra minutes to the baking time.
What’s the best way to reheat leftover pizza rolls?
For the crispiest results, I recommend reheating them in a toaster oven or a conventional oven at around 350°F (175°C) for 5-10 minutes, or until heated through and crispy. Microwaving will make them soft, so it’s best to avoid that if you want that satisfying crunch.
Can I freeze the baked pizza rolls?
Definitely! Once baked and completely cooled, you can freeze them in a single layer on a baking sheet until solid, then transfer them to a freezer-safe bag or container. Reheat them using the oven or toaster oven method mentioned above.
Pizza Rolls
Homemade pizza rolls made with Pillsbury pizza dough, pepperoni, mozzarella, and a medley of vegetables, baked until golden and served with dipping sauce.
Ingredients
-
1 tube Pillsbury pizza dough
-
1 ½ cups beef pepperoni slices
-
1 ½ cups mozzarella cheese, shredded
-
1 cup pizza sauce
-
½ cup mushrooms, finely diced
-
½ cup onions, finely diced
-
½ cup bell peppers, finely diced
-
¼ cup salted butter, melted
-
1 clove garlic, minced
-
1 teaspoon parsley, dried or fresh
-
Pizza sauce, for dipping
-
Parmesan cheese, for garnish
Instructions
-
Step 1
Preheat your oven to 400°F (200°C). Lightly grease a baking sheet or line with parchment paper. -
Step 2
Unroll the pizza dough onto a lightly floured surface. Press or roll it into a rectangle, about 12×16 inches. -
Step 3
Spread the pizza sauce evenly over the dough, leaving a small border on one of the long sides. Sprinkle the shredded mozzarella cheese, pepperoni slices, diced mushrooms, onions, and bell peppers over the sauce. -
Step 4
Starting from the long side with the sauce and fillings, tightly roll up the dough. Pinch the seam to seal. -
Step 5
Cut the roll into 1-inch thick slices. Place the slices cut-side up on the prepared baking sheet. -
Step 6
In a small bowl, combine the melted butter, minced garlic, and parsley (if using). Brush this mixture over the tops of the pizza rolls. -
Step 7
Bake for 12-15 minutes, or until the rolls are golden brown and the cheese is melted and bubbly. -
Step 8
Remove from oven, sprinkle with Parmesan cheese if desired, and serve immediately with pizza sauce for dipping.
Important Information
Nutrition Facts (Per Serving)
It is important to consider this information as approximate and not to use it as definitive health advice.
Allergy Information
Please check ingredients for potential allergens and consult a health professional if in doubt.