Easy Bunny Cake Recipe-Fun & Simple Bake
Easy Bunny Cake Recipe anyone can master! Spring is in the air, and what better way to celebrate than with a whimsical and delicious treat? This easy bunny cake recipe is an absolute showstopper, perfect for Easter gatherings, birthdays, or just a fun weekend baking project with the kids. It’s a universally loved dessert because it brings a smile to everyone’s face – from the youngest to the oldest! What truly makes this cake special is its charming bunny shape, which is surprisingly simple to achieve with just a few clever cuts and frosting techniques. Forget complicated decorating; this recipe focuses on fun and flavor, ensuring a delightful and stress-free baking experience. Get ready to hop into some baking joy!
Why You’ll Love This Easy Bunny Cake Recipe
Your Guide to a Delightful Dessert
Easy Bunny Cake Recipe
Spring is in the air, and what better way to celebrate than with a whimsical and absolutely adorable bunny cake! This recipe is designed to be super simple, even for begin extractner bakers. We’re taking a shortcut with store-bought cake layers and frosting, so you can focus on the fun part: decorating your fluffy friend. This cake is perfect for Easter celebrations, spring birthdays, or just to bring a smile to someone’s face. Imagin extracte presenting this sweet creation at your next gathering – it’s guaranteed to be a showstopper!
Ingredients:
Crafting Your Bunny
Now for the fun part! Let’s transform those plain cake layers into a delightful bunny.
Step 1: Preparing Your Cake Layers
First things first, ensure your cake layers are completely cooled. If you’ve baked them yourself, let them cool in the pans for about 10-15 minutes before inverting them onto a wire rack to cool completely. Warm cakes and frosting are a recipe for disaster, so patience here is key! Once cooled, you can optionally level the tops of your cakes with a serrated knife if they have a dome. This creates a flat surface for easier frosting. Place one cake layer on your serving platter or cake board.
Step 2: Frosting the Bunny’s Body
This is where the magic starts. Take a generous dollop of your white frosting and spread it evenly over the top of the first cake layer. Don’t worry about being perfectly smooth; we’re aiming for a fluffy texture. Now, carefully place the second cake layer on top of the first. Use the remaining white frosting to generously cover the entire cake, including the sides. As you frost, use your spatula or frosting knife to create little peaks and swirls to mimic fur. This texture is what makes your bunny look so soft and cuddly. If you’re using ready-made frosting, it’s often easiest to work with it at room temperature, but not too soft. If it’s too stiff, a few seconds in the microwave can help loosen it up, but be careful not to overheat it.
Step 3: Creating the Ears
This is arguably the most iconic part of any bunny! You have a couple of options for the ears. You can use additional cake layers, or if you have cookie cutters, you could cut out ear shapes from fondant or even stiffened cookies. For this super easy version, let’s create ears directly from frosting! Take your piping bag fitted with a large round tip. Fill it with white frosting. Pipe two large, elongated oval shapes on the top of the cake, sticking up slightly. Think of two elongated teardrops, one on each side of where the bunny’s head would be. Don’t be afraid to make them substantial; these are the bunny’s ears! For extra dimension, you can pipe a second layer of frosting on top of the first to make them appear more robust. If you want slightly more defined ears, you can also make them ahead of time using a stiff frosting, pipe them onto parchment paper, freeze until firm, and then attach them.
Step 4: Adding the Pink Details and Face
Now it’s time for the delicate details that bring our bunny to life. Take your piping bag fitted with a small round tip and fill it with your pink frosting. Pipe a smaller, elongated oval shape inside each of the white ear shapes you just created. This is the inner ear! Next, using the same pink frosting, pipe a little upside-down triangle or a small heart shape for the bunny’s nose, right in the center of where the face would be. Now, switch to your chocolate icing or melted chocolate in a piping bag with a very fine tip (or even a toothpick if you’re very careful). Pipe two small dots for the eyes above the nose. For the mouth, pipe a small ‘w’ shape beneath the nose. You can also add a few delicate lines extending from the nose area for whiskers. Remember, practice piping on a piece of parchment paper first if you’re new to piping details.
Step 5: Embellishments and Finishing Touches
This is where you can let your creativity shine! If you have jellybeans or colorful round candies, you can strategically place them around the base of the cake, or even create a little colorful accent on the bunny’s cheek or around the edges of the cake. This adds a playful and festive touch. You can also use your white frosting and a small star tip to pipe a border around the bottom of the cake for a more polished look. Once all your decorations are in place, step back and admire your adorable creation! This bunny cake is a labor of love that’s surprisingly simple to achieve. Enjoy the compliments and the deliciousness!

Conclusion:
There you have it – a wonderfully simple and delightful Easy Bunny Cake Recipe that’s perfect for Easter celebrations, spring parties, or just a fun baking project with loved ones. This recipe is fantastic because it uses straightforward ingredients and techniques, making it accessible even for begin extractner bakers. The charming bunny shape is sure to bring smiles to faces of all ages, and the moist, delicious cake is a crowd-pleaser every time. I really hope you give this a try!
This cake is wonderfully versatile. For serving, a simple dusting of powdered sugar can mimic snow, or a light vanilla glaze adds a touch of sweetness. It also pairs beautifully with fresh berries or a dollop of whipped cream. For variations, consider adding a hint of lemon zest to the batter for a brighter flavor, or tinting the frosting pastel colors for a more festive look. You could even add chocolate chips for a decadent twist! Don’t be afraid to get creative and make it your own.
Baking should be fun and rewarding, and this Easy Bunny Cake Recipe truly embodies that. So grab your apron, gather your ingredients, and let’s create some delicious memories together!
Frequently Asked Questions:
Can I make this cake ahead of time?
Absolutely! You can bake the cake layers a day in advance and store them at room temperature, tightly wrapped in plastic wrap, once completely cooled. Frosting it the day you plan to serve it is ideal for the freshest taste and appearance.
What if I don’t have cake pans in the exact size required?
No worries! You can usually substitute with pans that are similar in volume. If your pans are slightly larger, the cake might bake a little faster, so keep an eye on it. If they are slightly smaller, you might need a bit more baking time.
How can I make the bunny shape more defined if it’s not turning out perfectly?
Don’t fret over perfection! A little frosting magic can fix most things. You can use a piping bag with a star tip to create textured fur, which helps camouflage any slight imperfections in the shape. You can also use candies or sprinkles to add decorative details that draw the eye.
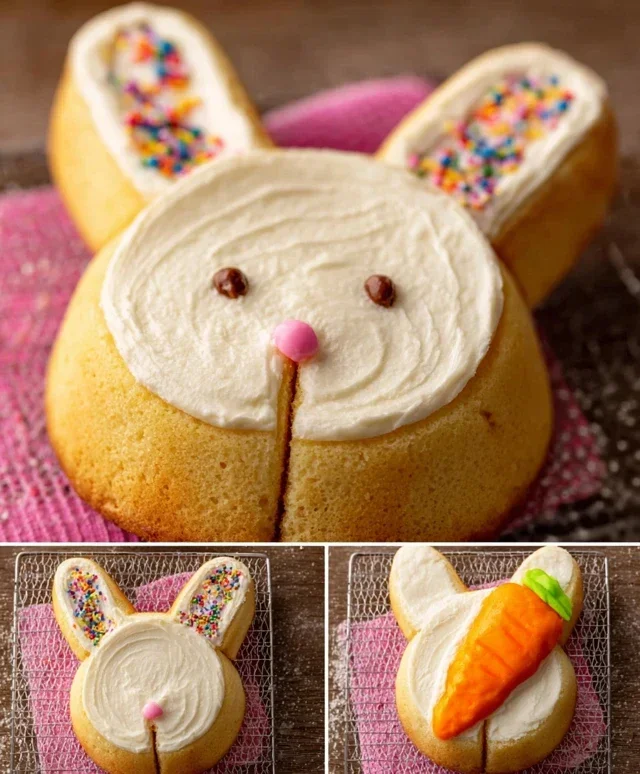
Easy Bunny Cake Recipe
A simple and fun bunny-shaped cake perfect for Easter or any springtime celebration.
Ingredients
-
Two round cake layers (use one cake mix or your favorite homemade recipe)
-
White frosting (ready-made or your favorite homemade recipe)
-
Pink frosting (or use pink gel food coloring on white frosting)
-
Chocolate icing or melted chocolate for details
-
Jellybeans or colorful round candies
-
Piping bags
Instructions
-
Step 1
Prepare your two round cake layers according to the cake mix or your favorite homemade recipe instructions. Let them cool completely. -
Step 2
Once cooled, place one cake layer on your serving platter. This will be the bunny’s body. -
Step 3
Carefully cut the second cake layer in half. These will be the bunny’s ears. Position the semi-circles on top of the body layer, leaning slightly outwards. -
Step 4
Generously cover the entire cake structure with white frosting, smoothing it to create a fluffy bunny appearance. -
Step 5
Using pink frosting, create two small inner ear shapes within the white ear sections. Add pink cheeks on the bunny’s face. -
Step 6
Use chocolate icing or melted chocolate to pipe on two eyes and a small nose. -
Step 7
Decorate the bunny’s face and body with jellybeans or colorful round candies to add festive details.
Important Information
Nutrition Facts (Per Serving)
It is important to consider this information as approximate and not to use it as definitive health advice.
Allergy Information
Please check ingredients for potential allergens and consult a health professional if in doubt.